
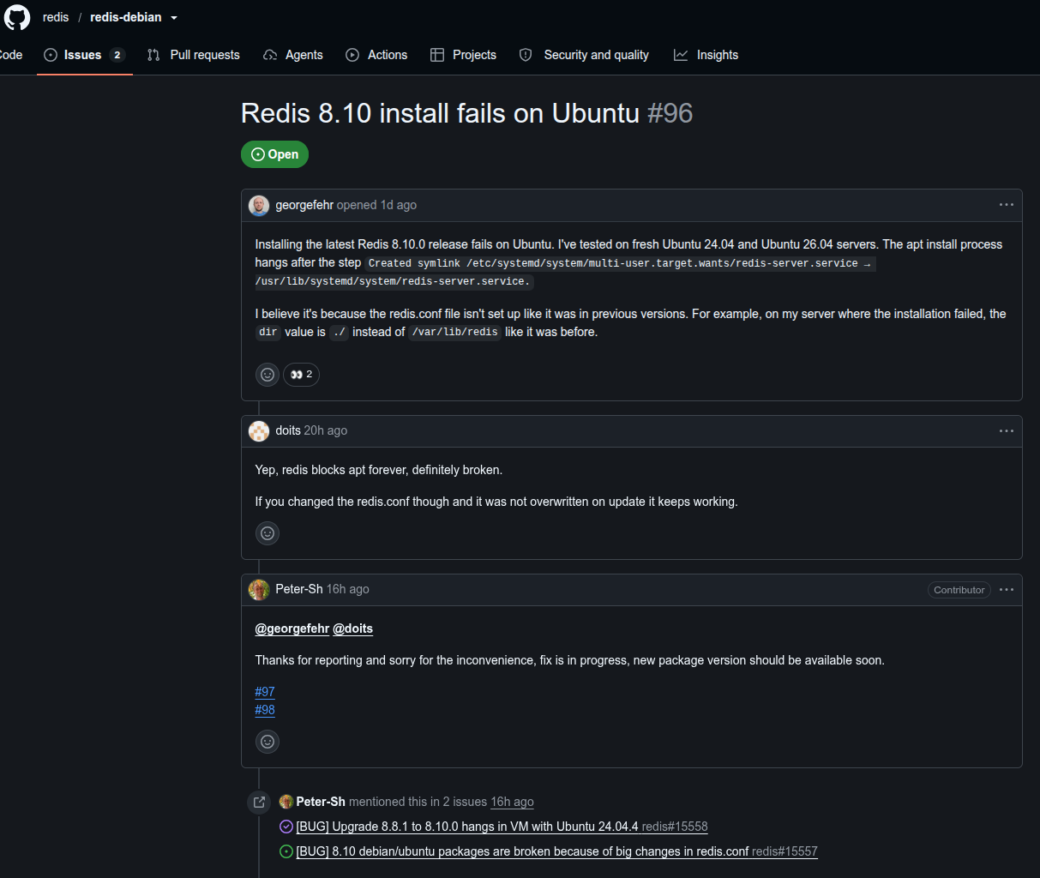
On new update from apt redis.io source which will upgrade to Redis server v=8.10.0, will get error:
> Failed to write PID file: Permission denied
In that case for quick fix, just revert to old config file located at: /ect/redis/redis.conf, below is working version until now, for anyone would like to get back to work and keep waiting developer fix these issue
https://github.com/redis/redis-debian/issues/96
# Redis configuration file example.

#

# Note that in order to read the configuration file, Redis must be

# started with the file path as first argument:

#

# ./redis-server /path/to/redis.conf
# Note on units: when memory size is needed, it is possible to specify
# it in the usual form of 1k 5GB 4M and so forth:
#
# 1k => 1000 bytes
# 1kb => 1024 bytes
# 1m => 1000000 bytes
# 1mb => 1024*1024 bytes
# 1g => 1000000000 bytes
# 1gb => 1024*1024*1024 bytes
#
# units are case insensitive so 1GB 1Gb 1gB are all the same.
################################## INCLUDES ###################################
# Include one or more other config files here. This is useful if you
# have a standard template that goes to all Redis servers but also need
# to customize a few per-server settings. Include files can include
# other files, so use this wisely.
#
# Note that option "include" won't be rewritten by command "CONFIG REWRITE"
# from admin or Redis Sentinel. Since Redis always uses the last processed
# line as value of a configuration directive, you'd better put includes
# at the beginning of this file to avoid overwriting config change at runtime.
#
# If instead you are interested in using includes to override configuration
# options, it is better to use include as the last line.
#
# Included paths may contain wildcards. All files matching the wildcards will
# be included in alphabetical order.
# Note that if an include path contains a wildcards but no files match it when
# the server is started, the include statement will be ignored and no error will
# be emitted. It is safe, therefore, to include wildcard files from empty
# directories.
#
# include /path/to/local.conf
# include /path/to/other.conf
# include /path/to/fragments/*.conf
#
################################## MODULES #####################################
# Load modules at startup. If the server is not able to load modules
# it will abort. It is possible to use multiple loadmodule directives.
#
# loadmodule /path/to/my_module.so
# loadmodule /path/to/other_module.so
# loadmodule /path/to/args_module.so [arg [arg ...]]
################################## NETWORK #####################################
# By default, if no "bind" configuration directive is specified, Redis listens
# for connections from all available network interfaces on the host machine.
# It is possible to listen to just one or multiple selected interfaces using
# the "bind" configuration directive, followed by one or more IP addresses.
# Each address can be prefixed by "-", which means that redis will not fail to
# start if the address is not available. Being not available only refers to
# addresses that does not correspond to any network interface. Addresses that
# are already in use will always fail, and unsupported protocols will always BE
# silently skipped.
#
# Examples:
#
# bind 192.168.1.100 10.0.0.1 # listens on two specific IPv4 addresses
# bind 127.0.0.1 ::1 # listens on loopback IPv4 and IPv6
# bind * -::* # like the default, all available interfaces
#
# ~~~ WARNING ~~~ If the computer running Redis is directly exposed to the
# internet, binding to all the interfaces is dangerous and will expose the
# instance to everybody on the internet. So by default we uncomment the
# following bind directive, that will force Redis to listen only on the
# IPv4 and IPv6 (if available) loopback interface addresses (this means Redis
# will only be able to accept client connections from the same host that it is
# running on).
#
# IF YOU ARE SURE YOU WANT YOUR INSTANCE TO LISTEN TO ALL THE INTERFACES
# COMMENT OUT THE FOLLOWING LINE.
#
# You will also need to set a password unless you explicitly disable protected
# mode.
# ~~~~~~~~~~~~~~~~~~~~~~~~~~~~~~~~~~~~~~~~~~~~~~~~~~~~~~~~~~~~~~~~~~~~~~~~
bind 127.0.0.1 -::1
# By default, outgoing connections (from replica to master, from Sentinel to
# instances, cluster bus, etc.) are not bound to a specific local address. In
# most cases, this means the operating system will handle that based on routing
# and the interface through which the connection goes out.
#
# Using bind-source-addr it is possible to configure a specific address to bind
# to, which may also affect how the connection gets routed.
#
# Example:
#
# bind-source-addr 10.0.0.1
# Protected mode is a layer of security protection, in order to avoid that
# Redis instances left open on the internet are accessed and exploited.
#
# When protected mode is on and the default user has no password, the server
# only accepts local connections from the IPv4 address (127.0.0.1), IPv6 address
# (::1) or Unix domain sockets.
#
# By default protected mode is enabled. You should disable it only if
# you are sure you want clients from other hosts to connect to Redis
# even if no authentication is configured.
protected-mode yes
# Redis uses default hardened security configuration directives to reduce the
# attack surface on innocent users. Therefore, several sensitive configuration
# directives are immutable, and some potentially-dangerous commands are blocked.
#
# Configuration directives that control files that Redis writes to (e.g., 'dir'
# and 'dbfilename') and that aren't usually modified during runtime
# are protected by making them immutable.
#
# Commands that can increase the attack surface of Redis and that aren't usually
# called by users are blocked by default.
#
# These can be exposed to either all connections or just local ones by setting
# each of the configs listed below to either of these values:
#
# no - Block for any connection (remain immutable)
# yes - Allow for any connection (no protection)
# local - Allow only for local connections. Ones originating from the
# IPv4 address (127.0.0.1), IPv6 address (::1) or Unix domain sockets.
#
# enable-protected-configs no
# enable-debug-command no
# enable-module-command no
# Accept connections on the specified port, default is 6379 (IANA #815344).
# If port 0 is specified Redis will not listen on a TCP socket.
port 6379
# TCP listen() backlog.
#
# In high requests-per-second environments you need a high backlog in order
# to avoid slow clients connection issues. Note that the Linux kernel
# will silently truncate it to the value of /proc/sys/net/core/somaxconn so
# make sure to raise both the value of somaxconn and tcp_max_syn_backlog
# in order to get the desired effect.
tcp-backlog 511
# Unix socket.
#
# Specify the path for the Unix socket that will be used to listen for
# incoming connections. There is no default, so Redis will not listen
# on a unix socket when not specified.
#
# unixsocket /run/redis.sock
# unixsocketperm 700
# Close the connection after a client is idle for N seconds (0 to disable)
timeout 0
# TCP keepalive.
#
# If non-zero, use SO_KEEPALIVE to send TCP ACKs to clients in absence
# of communication. This is useful for two reasons:
#
# 1) Detect dead peers.
# 2) Force network equipment in the middle to consider the connection to be
# alive.
#
# On Linux, the specified value (in seconds) is the period used to send ACKs.
# Note that to close the connection the double of the time is needed.
# On other kernels the period depends on the kernel configuration.
#
# A reasonable value for this option is 300 seconds, which is the new
# Redis default starting with Redis 3.2.1.
tcp-keepalive 300
# Apply OS-specific mechanism to mark the listening socket with the specified
# ID, to support advanced routing and filtering capabilities.
#
# On Linux, the ID represents a connection mark.
# On FreeBSD, the ID represents a socket cookie ID.
# On OpenBSD, the ID represents a route table ID.
#
# The default value is 0, which implies no marking is required.
# socket-mark-id 0
################################# TLS/SSL #####################################
# By default, TLS/SSL is disabled. To enable it, the "tls-port" configuration
# directive can be used to define TLS-listening ports. To enable TLS on the
# default port, use:
#
# port 0
# tls-port 6379
# Configure a X.509 certificate and private key to use for authenticating the
# server to connected clients, masters or cluster peers. These files should be
# PEM formatted.
#
# tls-cert-file redis.crt
# tls-key-file redis.key
#
# If the key file is encrypted using a passphrase, it can be included here
# as well.
#
# tls-key-file-pass secret
# Normally Redis uses the same certificate for both server functions (accepting
# connections) and client functions (replicating from a master, establishing
# cluster bus connections, etc.).
#
# Sometimes certificates are issued with attributes that designate them as
# client-only or server-only certificates. In that case it may be desired to use
# different certificates for incoming (server) and outgoing (client)
# connections. To do that, use the following directives:
#
# tls-client-cert-file client.crt
# tls-client-key-file client.key
#
# If the key file is encrypted using a passphrase, it can be included here
# as well.
#
# tls-client-key-file-pass secret
# Configure a DH parameters file to enable Diffie-Hellman (DH) key exchange,
# required by older versions of OpenSSL (<3.0). Newer versions do not require
# this configuration and recommend against it.
#
# tls-dh-params-file redis.dh
# Configure a CA certificate(s) bundle or directory to authenticate TLS/SSL
# clients and peers. Redis requires an explicit configuration of at least one
# of these, and will not implicitly use the system wide configuration.
#
# tls-ca-cert-file ca.crt
# tls-ca-cert-dir /etc/ssl/certs
# By default, clients (including replica servers) on a TLS port are required
# to authenticate using valid client side certificates.
#
# If "no" is specified, client certificates are not required and not accepted.
# If "optional" is specified, client certificates are accepted and must be
# valid if provided, but are not required.
#
# tls-auth-clients no
# tls-auth-clients optional
# Automatically authenticate TLS clients as Redis users based on their
# certificates.
#
# If set to a field like "CN", the server will extract the corresponding field
# from the client's TLS certificate and attempt to find a Redis user with the
# same name. If a matching user is found, the client is automatically
# authenticated as that user during the TLS handshake. If no matching user is
# found, the client is connected as the unauthenticated default user. Set to
# "off" to disable automatic user authentication via certificate fields.
#
# Supported values: CN, off. Default: off.
#
# Matches certificate CN to Redis username (exact match only).
# Example: Cert CN=myapp -> authenticates as user "myapp"
#
# tls-auth-clients-user CN
# By default, a Redis replica does not attempt to establish a TLS connection
# with its master.
#
# Use the following directive to enable TLS on replication links.
#
# tls-replication yes
# By default, the Redis Cluster bus uses a plain TCP connection. To enable
# TLS for the bus protocol, use the following directive:
#
# tls-cluster yes
# Verify the peer certificate's identity on server-to-server TLS connections.
#
# By default, TLS validates only that a peer certificate chains to the trusted
# CA (tls-ca-cert-file / tls-ca-cert-dir); it does NOT check that the certificate
# belongs to the specific peer being contacted. This is safe when the CA is a
# dedicated, per-cluster CA, because every certificate it signs necessarily
# belongs to one of your own nodes. If instead you use a shared, organizational,
# or public CA, any holder of a certificate signed by that CA could impersonate a
# master/peer (for replication, cluster bus, or MIGRATE connections).
#
# When set, tls-expected-peer-name additionally requires the peer certificate to
# carry one of the given names in its Subject Alternative Name (SAN) field (or CN
# as a fallback). Issue every node's certificate with a shared cluster-identity
# SAN and set this to that name; a certificate from the same CA that lacks the
# name is then rejected. The name is taken from this local configuration only —
# never from the address dialed or from data received over the wire.
#
# The check applies to BOTH directions of server-to-server TLS: outbound
# connections (the peer's server certificate is verified) and inbound cluster-bus
# connections (the connecting peer's client certificate is verified). Because a
# node's outbound/client certificate is now verified by its peers, that identity
# SAN must be present on whatever certificate the node presents as a client, i.e.
# on tls-client-cert-file (or on tls-cert-file when no separate client cert is
# configured), in addition to its server certificate.
#
# Multiple names may be given as a single space-separated value (quote it); a
# match against any one of them succeeds. Full-label wildcards (e.g.
# "*.example.com") match; partial-label wildcards (e.g. "f*.example.com") do not.
#
# This does not affect ordinary client connections to the data port, whose
# identity/authorization is handled by AUTH/ACL (and optionally
# tls-auth-clients-user). Default: unset (no peer-name check).
#
# tls-expected-peer-name node.my-redis-cluster.example.com
# By default, only TLSv1.2 and TLSv1.3 are enabled and it is highly recommended
# that older formally deprecated versions are kept disabled to reduce the attack surface.
# You can explicitly specify TLS versions to support.
# Allowed values are case insensitive and include "TLSv1", "TLSv1.1", "TLSv1.2",
# "TLSv1.3" (OpenSSL >= 1.1.1) or any combination.
# To enable only TLSv1.2 and TLSv1.3, use:
#
# tls-protocols "TLSv1.2 TLSv1.3"
# Configure allowed ciphers. See the ciphers(1ssl) manpage for more information
# about the syntax of this string.
#
# Note: this configuration applies only to <= TLSv1.2.
#
# tls-ciphers DEFAULT:!MEDIUM
# Configure allowed TLSv1.3 ciphersuites. See the ciphers(1ssl) manpage for more
# information about the syntax of this string, and specifically for TLSv1.3
# ciphersuites.
#
# tls-ciphersuites TLS_CHACHA20_POLY1305_SHA256
# When choosing a cipher, use the server's preference instead of the client
# preference. By default, the server follows the client's preference.
#
# tls-prefer-server-ciphers yes
# By default, TLS session caching is enabled to allow faster and less expensive
# reconnections by clients that support it. Use the following directive to disable
# caching.
#
# tls-session-caching no
# Change the default number of TLS sessions cached. A zero value sets the cache
# to unlimited size. The default size is 20480.
#
# tls-session-cache-size 5000
# Change the default timeout of cached TLS sessions. The default timeout is 300
# seconds.
#
# tls-session-cache-timeout 60
################################# GENERAL #####################################
# By default Redis does not run as a daemon. Use 'yes' if you need it.
# Note that Redis will write a pid file in /var/run/redis.pid when daemonized.
# When Redis is supervised by upstart or systemd, this parameter has no impact.
daemonize no
# If you run Redis from upstart or systemd, Redis can interact with your
# supervision tree. Options:
# supervised no - no supervision interaction
# supervised upstart - signal upstart by putting Redis into SIGSTOP mode
# requires "expect stop" in your upstart job config
# supervised systemd - signal systemd by writing READY=1 to $NOTIFY_SOCKET
# on startup, and updating Redis status on a regular
# basis.
# supervised auto - detect upstart or systemd method based on
# UPSTART_JOB or NOTIFY_SOCKET environment variables
# Note: these supervision methods only signal "process is ready."
# They do not enable continuous pings back to your supervisor.
#
# The default is "no". To run under upstart/systemd, you can simply uncomment
# the line below:
#
supervised auto
# If a pid file is specified, Redis writes it where specified at startup
# and removes it at exit.
#
# When the server runs non daemonized, no pid file is created if none is
# specified in the configuration. When the server is daemonized, the pid file
# is used even if not specified, defaulting to "/var/run/redis.pid".
#
# Creating a pid file is best effort: if Redis is not able to create it
# nothing bad happens, the server will start and run normally.
#
# Note that on modern Linux systems "/run/redis.pid" is more conforming
# and should be used instead.
#pidfile /run/redis/redis-server.pid
# Specify the server verbosity level.
# This can be one of:
# debug (a lot of information, useful for development/testing)
# verbose (many rarely useful info, but not a mess like the debug level)
# notice (moderately verbose, what you want in production probably)
# warning (only very important / critical messages are logged)
# nothing (nothing is logged)
loglevel notice
# Specify the log file name. Also the empty string can be used to force
# Redis to log on the standard output. Note that if you use standard
# output for logging but daemonize, logs will be sent to /dev/null
logfile /var/log/redis/redis-server.log
# To enable logging to the system logger, just set 'syslog-enabled' to yes,
# and optionally update the other syslog parameters to suit your needs.
# syslog-enabled no
# Specify the syslog identity.
# syslog-ident redis
# Specify the syslog facility. Must be USER or between LOCAL0-LOCAL7.
# syslog-facility local0
# To disable the built in crash log, which will possibly produce cleaner core
# dumps when they are needed, uncomment the following:
#
# crash-log-enabled no
# To disable the fast memory check that's run as part of the crash log, which
# will possibly let redis terminate sooner, uncomment the following:
#
# crash-memcheck-enabled no
# Set the number of databases. The default database is DB 0, you can select
# a different one on a per-connection basis using SELECT
# dbid is a number between 0 and 'databases'-1
databases 16
# By default Redis shows an ASCII art logo only when started to log to the
# standard output and if the standard output is a TTY and syslog logging is
# disabled. Basically this means that normally a logo is displayed only in
# interactive sessions.
#
# However it is possible to force the pre-4.0 behavior and always show a
# ASCII art logo in startup logs by setting the following option to yes.
always-show-logo no
# To avoid logging personal identifiable information (PII) into server log file,
# uncomment the following:
#
# hide-user-data-from-log yes
# By default, Redis modifies the process title (as seen in 'top' and 'ps') to
# provide some runtime information. It is possible to disable this and leave
# the process name as executed by setting the following to no.
set-proc-title yes
# When changing the process title, Redis uses the following template to construct
# the modified title.
#
# Template variables are specified in curly brackets. The following variables are
# supported:
#
# {title} Name of process as executed if parent, or type of child process.
# {listen-addr} Bind address or '*' followed by TCP or TLS port listening on, or
# Unix socket if only that's available.
# {server-mode} Special mode, i.e. "[sentinel]" or "[cluster]".
# {port} TCP port listening on, or 0.
# {tls-port} TLS port listening on, or 0.
# {unixsocket} Unix domain socket listening on, or "".
# {config-file} Name of configuration file used.
#
proc-title-template "{title} {listen-addr} {server-mode}"
# Set the local environment which is used for string comparison operations, and
# also affect the performance of Lua scripts. Empty String indicates the locale
# is derived from the environment variables.
locale-collate ""
################################ SNAPSHOTTING ################################
# Save the DB to disk.
#
# save
#
# Redis will save the DB if the given number of seconds elapsed and it
# surpassed the given number of write operations against the DB.
#
# Snapshotting can be completely disabled with a single empty string argument
# as in following example:
#
# save ""
#
# Unless specified otherwise, by default Redis will save the DB:
# * After 3600 seconds (an hour) if at least 1 change was performed
# * After 300 seconds (5 minutes) if at least 100 changes were performed
# * After 60 seconds if at least 10000 changes were performed
#
# You can set these explicitly by uncommenting the following line.
#
# save 3600 1 300 100 60 10000
# By default Redis will stop accepting writes if RDB snapshots are enabled
# (at least one save point) and the latest background save failed.
# This will make the user aware (in a hard way) that data is not persisting
# on disk properly, otherwise chances are that no one will notice and some
# disaster will happen.
#
# If the background saving process will start working again Redis will
# automatically allow writes again.
#
# However if you have setup your proper monitoring of the Redis server
# and persistence, you may want to disable this feature so that Redis will
# continue to work as usual even if there are problems with disk,
# permissions, and so forth.
stop-writes-on-bgsave-error yes
# Compress string objects using LZF when dump .rdb databases?
# By default compression is enabled as it's almost always a win.
# If you want to save some CPU in the saving child set it to 'no' but
# the dataset will likely be bigger if you have compressible values or keys.
rdbcompression yes
# Since version 5 of RDB a CRC64 checksum is placed at the end of the file.
# This makes the format more resistant to corruption but there is a performance
# hit to pay (around 10%) when saving and loading RDB files, so you can disable it
# for maximum performances.
#
# RDB files created with checksum disabled have a checksum of zero that will
# tell the loading code to skip the check.
rdbchecksum yes
# Enables or disables full sanitization checks for ziplist and listpack etc when
# loading an RDB or RESTORE payload. This reduces the chances of a assertion or
# crash later on while processing commands.
# Options:
# no - Never perform full sanitization
# yes - Always perform full sanitization
# clients - Perform full sanitization only for user connections.
# Excludes: RDB files, RESTORE commands received from the master
# connection, and client connections which have the
# skip-sanitize-payload ACL flag.
# The default should be 'clients' but since it currently affects cluster
# resharding via MIGRATE, it is temporarily set to 'no' by default.
#
# sanitize-dump-payload no
# The filename where to dump the DB
dbfilename dump.rdb
# Remove RDB files used by replication in instances without persistence
# enabled. By default this option is disabled, however there are environments
# where for regulations or other security concerns, RDB files persisted on
# disk by masters in order to feed replicas, or stored on disk by replicas
# in order to load them for the initial synchronization, should be deleted
# ASAP. Note that this option ONLY WORKS in instances that have both AOF
# and RDB persistence disabled, otherwise is completely ignored.
#
# An alternative (and sometimes better) way to obtain the same effect is
# to use diskless replication on both master and replicas instances. However
# in the case of replicas, diskless is not always an option.
rdb-del-sync-files no
# The working directory.
#
# The DB will be written inside this directory, with the filename specified
# above using the 'dbfilename' configuration directive.
#
# The Append Only File will also be created inside this directory.
#
# Note that you must specify a directory here, not a file name.
dir /var/lib/redis
################################# REPLICATION #################################
# Master-Replica replication. Use replicaof to make a Redis instance a copy of
# another Redis server. A few things to understand ASAP about Redis replication.
#
# +------------------+ +---------------+
# | Master | ---> | Replica |
# | (receive writes) | | (exact copy) |
# +------------------+ +---------------+
#
# 1) Redis replication is asynchronous, but you can configure a master to
# stop accepting writes if it appears to be not connected with at least
# a given number of replicas.
# 2) Redis replicas are able to perform a partial resynchronization with the
# master if the replication link is lost for a relatively small amount of
# time. You may want to configure the replication backlog size (see the next
# sections of this file) with a sensible value depending on your needs.
# 3) Replication is automatic and does not need user intervention. After a
# network partition replicas automatically try to reconnect to masters
# and resynchronize with them.
#
# replicaof
# If the master is password protected (using the "requirepass" configuration
# directive below) it is possible to tell the replica to authenticate before
# starting the replication synchronization process, otherwise the master will
# refuse the replica request.
#
# masterauth
#
# However this is not enough if you are using Redis ACLs (for Redis version
# 6 or greater), and the default user is not capable of running the PSYNC
# command and/or other commands needed for replication. In this case it's
# better to configure a special user to use with replication, and specify the
# masteruser configuration as such:
#
# masteruser
#
# When masteruser is specified, the replica will authenticate against its
# master using the new AUTH form: AUTH
# When a replica loses its connection with the master, or when the replication
# is still in progress, the replica can act in two different ways:
#
# 1) if replica-serve-stale-data is set to 'yes' (the default) the replica will
# still reply to client requests, possibly with out of date data, or the
# data set may just be empty if this is the first synchronization.
#
# 2) If replica-serve-stale-data is set to 'no' the replica will reply with error
# "MASTERDOWN Link with MASTER is down and replica-serve-stale-data is set to 'no'"
# to all data access commands, excluding commands such as:
# INFO, REPLICAOF, AUTH, SHUTDOWN, REPLCONF, ROLE, CONFIG, SUBSCRIBE,
# UNSUBSCRIBE, PSUBSCRIBE, PUNSUBSCRIBE, PUBLISH, PUBSUB, COMMAND, POST,
# HOST and LATENCY.
#
replica-serve-stale-data yes
# You can configure a replica instance to accept writes or not. Writing against
# a replica instance may be useful to store some ephemeral data (because data
# written on a replica will be easily deleted after resync with the master) but
# may also cause problems if clients are writing to it because of a
# misconfiguration.
#
# Since Redis 2.6 by default replicas are read-only.
#
# Note: read only replicas are not designed to be exposed to untrusted clients
# on the internet. It's just a protection layer against misuse of the instance.
# Still a read only replica exports by default all the administrative commands
# such as CONFIG, DEBUG, and so forth. To a limited extent you can improve
# security of read only replicas using 'rename-command' to shadow all the
# administrative / dangerous commands.
replica-read-only yes
# Replication SYNC strategy: disk or socket.
#
# New replicas and reconnecting replicas that are not able to continue the
# replication process just receiving differences, need to do what is called a
# "full synchronization". An RDB file is transmitted from the master to the
# replicas.
#
# The transmission can happen in two different ways:
#
# 1) Disk-backed: The Redis master creates a new process that writes the RDB
# file on disk. Later the file is transferred by the parent
# process to the replicas incrementally.
# 2) Diskless: The Redis master creates a new process that directly writes the
# RDB file to replica sockets, without touching the disk at all.
#
# With disk-backed replication, while the RDB file is generated, more replicas
# can be queued and served with the RDB file as soon as the current child
# producing the RDB file finishes its work. With diskless replication instead
# once the transfer starts, new replicas arriving will be queued and a new
# transfer will start when the current one terminates.
#
# When diskless replication is used, the master waits a configurable amount of
# time (in seconds) before starting the transfer in the hope that multiple
# replicas will arrive and the transfer can be parallelized.
#
# With slow disks and fast (large bandwidth) networks, diskless replication
# works better.
repl-diskless-sync yes
# When diskless replication is enabled, it is possible to configure the delay
# the server waits in order to spawn the child that transfers the RDB via socket
# to the replicas.
#
# This is important since once the transfer starts, it is not possible to serve
# new replicas arriving, that will be queued for the next RDB transfer, so the
# server waits a delay in order to let more replicas arrive.
#
# The delay is specified in seconds, and by default is 5 seconds. To disable
# it entirely just set it to 0 seconds and the transfer will start ASAP.
repl-diskless-sync-delay 5
# When diskless replication is enabled with a delay, it is possible to let
# the replication start before the maximum delay is reached if the maximum
# number of replicas expected have connected. Default of 0 means that the
# maximum is not defined and Redis will wait the full delay.
repl-diskless-sync-max-replicas 0
# -----------------------------------------------------------------------------
# WARNING: Since in this setup the replica does not immediately store an RDB on
# disk, it may cause data loss during failovers. RDB diskless load + Redis
# modules not handling I/O reads may cause Redis to abort in case of I/O errors
# during the initial synchronization stage with the master.
# -----------------------------------------------------------------------------
#
# Replica can load the RDB it reads from the replication link directly from the
# socket, or store the RDB to a file and read that file after it was completely
# received from the master.
#
# In many cases the disk is slower than the network, and storing and loading
# the RDB file may increase replication time (and even increase the master's
# Copy on Write memory and replica buffers).
# However, when parsing the RDB file directly from the socket, in order to avoid
# data loss it's only safe to flush the current dataset when the new dataset is
# fully loaded in memory, resulting in higher memory usage.
# For this reason we have the following options:
#
# "disabled" - Don't use diskless load (store the rdb file to the disk first)
# "swapdb" - Keep current db contents in RAM while parsing the data directly
# from the socket. Replicas in this mode can keep serving current
# dataset while replication is in progress, except for cases where
# they can't recognize master as having a data set from same
# replication history.
# Note that this requires sufficient memory, if you don't have it,
# you risk an OOM kill.
# "flushdb" - Always flush the entire dataset before diskless load.
# Note that if the diskless load fails, the replica will lose all
# existing data.
# "on-empty-db" - Use diskless load only when current dataset is empty. This is
# safer and avoid having old and new dataset loaded side by side
# during replication.
repl-diskless-load disabled
# Master send PINGs to its replicas in a predefined interval. It's possible to
# change this interval with the repl-ping-replica-period option. The default
# value is 10 seconds.
#
# repl-ping-replica-period 10
# The following option sets the replication timeout for:
#
# 1) Bulk transfer I/O during SYNC, from the point of view of replica.
# 2) Master timeout from the point of view of replicas (data, pings).
# 3) Replica timeout from the point of view of masters (REPLCONF ACK pings).
#
# It is important to make sure that this value is greater than the value
# specified for repl-ping-replica-period otherwise a timeout will be detected
# every time there is low traffic between the master and the replica. The default
# value is 60 seconds.
#
# repl-timeout 60
# Disable TCP_NODELAY on the replica socket after SYNC?
#
# If you select "yes" Redis will use a smaller number of TCP packets and
# less bandwidth to send data to replicas. But this can add a delay for
# the data to appear on the replica side, up to 40 milliseconds with
# Linux kernels using a default configuration.
#
# If you select "no" the delay for data to appear on the replica side will
# be reduced but more bandwidth will be used for replication.
#
# By default we optimize for low latency, but in very high traffic conditions
# or when the master and replicas are many hops away, turning this to "yes" may
# be a good idea.
repl-disable-tcp-nodelay no
# Set the replication backlog size. The backlog is a buffer that accumulates
# replica data when replicas are disconnected for some time, so that when a
# replica wants to reconnect again, often a full resync is not needed, but a
# partial resync is enough, just passing the portion of data the replica
# missed while disconnected.
#
# The bigger the replication backlog, the longer the replica can endure the
# disconnect and later be able to perform a partial resynchronization.
#
# The backlog is only allocated if there is at least one replica connected.
#
# repl-backlog-size 1mb
# After a master has no connected replicas for some time, the backlog will be
# freed. The following option configures the amount of seconds that need to
# elapse, starting from the time the last replica disconnected, for the backlog
# buffer to be freed.
#
# Note that replicas never free the backlog for timeout, since they may be
# promoted to masters later, and should be able to correctly "partially
# resynchronize" with other replicas: hence they should always accumulate backlog.
#
# A value of 0 means to never release the backlog.
#
# repl-backlog-ttl 3600
# During a fullsync, the master may decide to send both the RDB file and the
# replication stream to the replica in parallel. This approach shifts the
# responsibility of buffering the replication stream to the replica during the
# fullsync process. The replica accumulates the replication stream data until
# the RDB file is fully loaded. Once the RDB delivery is completed and
# successfully loaded, the replica begins processing and applying the
# accumulated replication data to the db. The configuration below controls how
# much replication data the replica can accumulate during a fullsync.
#
# When the replica reaches this limit, it will stop accumulating further data.
# At this point, additional data accumulation may occur on the master side
# depending on the 'client-output-buffer-limit
#
# A value of 0 means replica inherits hard limit of
# 'client-output-buffer-limit
#
# replica-full-sync-buffer-limit 0
# The replica priority is an integer number published by Redis in the INFO
# output. It is used by Redis Sentinel in order to select a replica to promote
# into a master if the master is no longer working correctly.
#
# A replica with a low priority number is considered better for promotion, so
# for instance if there are three replicas with priority 10, 100, 25 Sentinel
# will pick the one with priority 10, that is the lowest.
#
# However a special priority of 0 marks the replica as not able to perform the
# role of master, so a replica with priority of 0 will never be selected by
# Redis Sentinel for promotion.
#
# By default the priority is 100.
replica-priority 100
# The propagation error behavior controls how Redis will behave when it is
# unable to handle a command being processed in the replication stream from a master
# or processed while reading from an AOF file. Errors that occur during propagation
# are unexpected, and can cause data inconsistency. However, there are edge cases
# in earlier versions of Redis where it was possible for the server to replicate or persist
# commands that would fail on future versions. For this reason the default behavior
# is to ignore such errors and continue processing commands.
#
# If an application wants to ensure there is no data divergence, this configuration
# should be set to 'panic' instead. The value can also be set to 'panic-on-replicas'
# to only panic when a replica encounters an error on the replication stream. One of
# these two panic values will become the default value in the future once there are
# sufficient safety mechanisms in place to prevent false positive crashes.
#
# propagation-error-behavior ignore
# Replica ignore disk write errors controls the behavior of a replica when it is
# unable to persist a write command received from its master to disk. By default,
# this configuration is set to 'no' and will crash the replica in this condition.
# It is not recommended to change this default, however in order to be compatible
# with older versions of Redis this config can be toggled to 'yes' which will just
# log a warning and execute the write command it got from the master.
#
# replica-ignore-disk-write-errors no
# -----------------------------------------------------------------------------
# By default, Redis Sentinel includes all replicas in its reports. A replica
# can be excluded from Redis Sentinel's announcements. An unannounced replica
# will be ignored by the 'sentinel replicas
# exposed to Redis Sentinel's clients.
#
# This option does not change the behavior of replica-priority. Even with
# replica-announced set to 'no', the replica can be promoted to master. To
# prevent this behavior, set replica-priority to 0.
#
# replica-announced yes
# It is possible for a master to stop accepting writes if there are less than
# N replicas connected, having a lag less or equal than M seconds.
#
# The N replicas need to be in "online" state.
#
# The lag in seconds, that must be <= the specified value, is calculated from
# the last ping received from the replica, that is usually sent every second.
#
# This option does not GUARANTEE that N replicas will accept the write, but
# will limit the window of exposure for lost writes in case not enough replicas
# are available, to the specified number of seconds.
#
# For example to require at least 3 replicas with a lag <= 10 seconds use:
#
# min-replicas-to-write 3
# min-replicas-max-lag 10
#
# Setting one or the other to 0 disables the feature.
#
# By default min-replicas-to-write is set to 0 (feature disabled) and
# min-replicas-max-lag is set to 10.
# Compression related configs. Compression is disabled by default, unless redis
# is build with BUILD_COMPRESSION=yes, hence why the configs are commented out.
#
# Enable client compression for replication at specified level when connecting to
# master 0-22 (0 for disabled compression). Currently only zstd compression lib
# is supported hence the compression values 1-22 are related to it.
# NOTE: This setting only works when io-threads > 1
# repl-compression 0
#
# When compression is enabled specify maximum latency in ms before the
# compressed data is flushed and send to the socket.
# repl-compression-max-latency 100
# A Redis master is able to list the address and port of the attached
# replicas in different ways. For example the "INFO replication" section
# offers this information, which is used, among other tools, by
# Redis Sentinel in order to discover replica instances.
# Another place where this info is available is in the output of the
# "ROLE" command of a master.
#
# The listed IP address and port normally reported by a replica is
# obtained in the following way:
#
# IP: The address is auto detected by checking the peer address
# of the socket used by the replica to connect with the master.
#
# Port: The port is communicated by the replica during the replication
# handshake, and is normally the port that the replica is using to
# listen for connections.
#
# However when port forwarding or Network Address Translation (NAT) is
# used, the replica may actually be reachable via different IP and port
# pairs. The following two options can be used by a replica in order to
# report to its master a specific set of IP and port, so that both INFO
# and ROLE will report those values.
#
# There is no need to use both the options if you need to override just
# the port or the IP address.
#
# replica-announce-ip 5.5.5.5
# replica-announce-port 1234
############################### KEYS TRACKING #################################
# Redis implements server assisted support for client side caching of values.
# This is implemented using an invalidation table that remembers, using
# a radix key indexed by key name, what clients have which keys. In turn
# this is used in order to send invalidation messages to clients. Please
# check this page to understand more about the feature:
#
# https://redis.io/docs/latest/develop/use/client-side-caching/
#
# When tracking is enabled for a client, all the read only queries are assumed
# to be cached: this will force Redis to store information in the invalidation
# table. When keys are modified, such information is flushed away, and
# invalidation messages are sent to the clients. However if the workload is
# heavily dominated by reads, Redis could use more and more memory in order
# to track the keys fetched by many clients.
#
# For this reason it is possible to configure a maximum fill value for the
# invalidation table. By default it is set to 1M of keys, and once this limit
# is reached, Redis will start to evict keys in the invalidation table
# even if they were not modified, just to reclaim memory: this will in turn
# force the clients to invalidate the cached values. Basically the table
# maximum size is a trade off between the memory you want to spend server
# side to track information about who cached what, and the ability of clients
# to retain cached objects in memory.
#
# If you set the value to 0, it means there are no limits, and Redis will
# retain as many keys as needed in the invalidation table.
# In the "stats" INFO section, you can find information about the number of
# keys in the invalidation table at every given moment.
#
# Note: when key tracking is used in broadcasting mode, no memory is used
# in the server side so this setting is useless.
#
# tracking-table-max-keys 1000000
################################## SECURITY ###################################
# Warning: since Redis is pretty fast, an outside user can try up to
# 1 million passwords per second against a modern box. This means that you
# should use very strong passwords, otherwise they will be very easy to break.
# Note that because the password is really a shared secret between the client
# and the server, and should not be memorized by any human, the password
# can be easily a long string from /dev/urandom or whatever, so by using a
# long and unguessable password no brute force attack will be possible.
# Redis ACL users are defined in the following format:
#
# user
#
# For example:
#
# user worker +@list +@connection ~jobs:* on >ffa9203c493aa99
#
# The special username "default" is used for new connections. If this user
# has the "nopass" rule, then new connections will be immediately authenticated
# as the "default" user without the need of any password provided via the
# AUTH command. Otherwise if the "default" user is not flagged with "nopass"
# the connections will start in not authenticated state, and will require
# AUTH (or the HELLO command AUTH option) in order to be authenticated and
# start to work.
#
# The ACL rules that describe what a user can do are the following:
#
# on Enable the user: it is possible to authenticate as this user.
# off Disable the user: it's no longer possible to authenticate
# with this user, however the already authenticated connections
# will still work.
# skip-sanitize-payload RESTORE dump-payload sanitization is skipped.
# sanitize-payload RESTORE dump-payload is sanitized (default).
# +
# May be used with `|` for allowing subcommands (e.g "+config|get")
# -
# May be used with `|` for blocking subcommands (e.g "-config|set")
# +@
# with valid categories are like @admin, @set, @sortedset, ...
# and so forth, see the full list in the server.c file where
# the Redis command table is described and defined.
# The special category @all means all the commands, but currently
# present in the server, and that will be loaded in the future
# via modules.
# +
# disabled command. It is only supported on commands with
# no sub-commands, and is not allowed as negative form
# like -SELECT|1, only additive starting with "+". This
# feature is deprecated and may be removed in the future.
# allcommands Alias for +@all. Note that it implies the ability to execute
# all the future commands loaded via the modules system.
# nocommands Alias for -@all.
# ~
# commands. For instance ~* allows all the keys. The pattern
# is a glob-style pattern like the one of KEYS.
# It is possible to specify multiple patterns.
# %R~
# from.
# %W~
# written to.
# allkeys Alias for ~*
# resetkeys Flush the list of allowed keys patterns.
# &
# accessed by the user. It is possible to specify multiple channel
# patterns.
# allchannels Alias for &*
# resetchannels Flush the list of allowed channel patterns.
# >
# For example >mypass will add "mypass" to the list.
# This directive clears the "nopass" flag (see later).
# <
# nopass All the set passwords of the user are removed, and the user
# is flagged as requiring no password: it means that every
# password will work against this user. If this directive is
# used for the default user, every new connection will be
# immediately authenticated with the default user without
# any explicit AUTH command required. Note that the "resetpass"
# directive will clear this condition.
# resetpass Flush the list of allowed passwords. Moreover removes the
# "nopass" status. After "resetpass" the user has no associated
# passwords and there is no way to authenticate without adding
# some password (or setting it as "nopass" later).
# reset Performs the following actions: resetpass, resetkeys, resetchannels,
# allchannels (if acl-pubsub-default is set), off, clearselectors, -@all.
# The user returns to the same state it has immediately after its creation.
# (
# parentheses and attach it to the user. Each option should be
# space separated. The first character must be ( and the last
# character must be ).
# clearselectors Remove all of the currently attached selectors.
# Note this does not change the "root" user permissions,
# which are the permissions directly applied onto the
# user (outside the parentheses).
#
# ACL rules can be specified in any order: for instance you can start with
# passwords, then flags, or key patterns. However note that the additive
# and subtractive rules will CHANGE MEANING depending on the ordering.
# For instance see the following example:
#
# user alice on +@all -DEBUG ~* >somepassword
#
# This will allow "alice" to use all the commands with the exception of the
# DEBUG command, since +@all added all the commands to the set of the commands
# alice can use, and later DEBUG was removed. However if we invert the order
# of two ACL rules the result will be different:
#
# user alice on -DEBUG +@all ~* >somepassword
#
# Now DEBUG was removed when alice had yet no commands in the set of allowed
# commands, later all the commands are added, so the user will be able to
# execute everything.
#
# Basically ACL rules are processed left-to-right.
#
# The following is a list of command categories and their meanings:
# * keyspace - Writing or reading from keys, databases, or their metadata
# in a type agnostic way. Includes DEL, RESTORE, DUMP, RENAME, EXISTS, DBSIZE,
# KEYS, EXPIRE, TTL, FLUSHALL, etc. Commands that may modify the keyspace,
# key or metadata will also have `write` category. Commands that only read
# the keyspace, key or metadata will have the `read` category.
# * read - Reading from keys (values or metadata). Note that commands that don't
# interact with keys, will not have either `read` or `write`.
# * write - Writing to keys (values or metadata)
# * admin - Administrative commands. Normal applications will never need to use
# these. Includes REPLICAOF, CONFIG, DEBUG, SAVE, MONITOR, ACL, SHUTDOWN, etc.
# * dangerous - Potentially dangerous (each should be considered with care for
# various reasons). This includes FLUSHALL, MIGRATE, RESTORE, SORT, KEYS,
# CLIENT, DEBUG, INFO, CONFIG, SAVE, REPLICAOF, etc.
# * connection - Commands affecting the connection or other connections.
# This includes AUTH, SELECT, COMMAND, CLIENT, ECHO, PING, etc.
# * blocking - Potentially blocking the connection until released by another
# command.
# * fast - Fast O(1) commands. May loop on the number of arguments, but not the
# number of elements in the key.
# * slow - All commands that are not Fast.
# * pubsub - PUBLISH / SUBSCRIBE related
# * transaction - WATCH / MULTI / EXEC related commands.
# * scripting - Scripting related.
# * set - Data type: sets related.
# * sortedset - Data type: zsets related.
# * list - Data type: lists related.
# * hash - Data type: hashes related.
# * string - Data type: strings related.
# * bitmap - Data type: bitmaps related.
# * hyperloglog - Data type: hyperloglog related.
# * geo - Data type: geo related.
# * stream - Data type: streams related.
#
# For more information about ACL configuration please refer to
# the Redis web site at https://redis.io/docs/latest/operate/oss_and_stack/management/security/acl/
# ACL LOG
#
# The ACL Log tracks failed commands and authentication events associated
# with ACLs. The ACL Log is useful to troubleshoot failed commands blocked
# by ACLs. The ACL Log is stored in memory. You can reclaim memory with
# ACL LOG RESET. Define the maximum entry length of the ACL Log below.
acllog-max-len 128
# Using an external ACL file
#
# Instead of configuring users here in this file, it is possible to use
# a stand-alone file just listing users. The two methods cannot be mixed:
# if you configure users here and at the same time you activate the external
# ACL file, the server will refuse to start.
#
# The format of the external ACL user file is exactly the same as the
# format that is used inside redis.conf to describe users.
#
# aclfile /etc/redis/users.acl
# IMPORTANT NOTE: starting with Redis 6 "requirepass" is just a compatibility
# layer on top of the new ACL system. The option effect will be just setting
# the password for the default user. Clients will still authenticate using
# AUTH
#
# The requirepass is not compatible with aclfile option and the ACL LOAD
# command, these will cause requirepass to be ignored.
#
# requirepass foobared
# New users are initialized with restrictive permissions by default, via the
# equivalent of this ACL rule 'off resetkeys -@all'. Starting with Redis 6.2, it
# is possible to manage access to Pub/Sub channels with ACL rules as well. The
# default Pub/Sub channels permission if new users is controlled by the
# acl-pubsub-default configuration directive, which accepts one of these values:
#
# allchannels: grants access to all Pub/Sub channels
# resetchannels: revokes access to all Pub/Sub channels
#
# From Redis 7.0, acl-pubsub-default defaults to 'resetchannels' permission.
#
# acl-pubsub-default resetchannels
# Command renaming (DEPRECATED).
#
# ------------------------------------------------------------------------
# WARNING: avoid using this option if possible. Instead use ACLs to remove
# commands from the default user, and put them only in some admin user you
# create for administrative purposes.
# ------------------------------------------------------------------------
#
# It is possible to change the name of dangerous commands in a shared
# environment. For instance the CONFIG command may be renamed into something
# hard to guess so that it will still be available for internal-use tools
# but not available for general clients.
#
# Example:
#
# rename-command CONFIG b840fc02d524045429941cc15f59e41cb7be6c52
#
# It is also possible to completely kill a command by renaming it into
# an empty string:
#
# rename-command CONFIG ""
#
# Please note that changing the name of commands that are logged into the
# AOF file or transmitted to replicas may cause problems.
################################### CLIENTS ####################################
# Set the max number of connected clients at the same time. By default
# this limit is set to 10000 clients, however if the Redis server is not
# able to configure the process file limit to allow for the specified limit
# the max number of allowed clients is set to the current file limit
# minus 32 (as Redis reserves a few file descriptors for internal uses).
#
# Once the limit is reached Redis will close all the new connections sending
# an error 'max number of clients reached'.
#
# IMPORTANT: When Redis Cluster is used, the max number of connections is also
# shared with the cluster bus: every node in the cluster will use two
# connections, one incoming and another outgoing. It is important to size the
# limit accordingly in case of very large clusters.
#
# maxclients 10000
############################## MEMORY MANAGEMENT ################################
# Set a memory usage limit to the specified amount of bytes.
# When the memory limit is reached Redis will try to remove keys
# according to the eviction policy selected (see maxmemory-policy).
#
# If Redis can't remove keys according to the policy, or if the policy is
# set to 'noeviction', Redis will start to reply with errors to commands
# that would use more memory, like SET, LPUSH, and so on, and will continue
# to reply to read-only commands like GET.
#
# This option is usually useful when using Redis as an LRU or LFU cache, or to
# set a hard memory limit for an instance (using the 'noeviction' policy).
#
# WARNING: If you have replicas attached to an instance with maxmemory on,
# the size of the output buffers needed to feed the replicas are subtracted
# from the used memory count, so that network problems / resyncs will
# not trigger a loop where keys are evicted, and in turn the output
# buffer of replicas is full with DELs of keys evicted triggering the deletion
# of more keys, and so forth until the database is completely emptied.
#
# In short... if you have replicas attached it is suggested that you set a lower
# limit for maxmemory so that there is some free RAM on the system for replica
# output buffers (but this is not needed if the policy is 'noeviction').
#
# maxmemory
# MAXMEMORY POLICY: how Redis will select what to remove when maxmemory
# is reached. You can select one from the following behaviors:
#
# volatile-lru -> Evict using approximated LRU, only keys with an expire set.
# allkeys-lru -> Evict any key using approximated LRU.
# volatile-lfu -> Evict using approximated LFU, only keys with an expire set.
# allkeys-lfu -> Evict any key using approximated LFU.
# volatile-lrm -> Evict using approximated LRM, only keys with an expire set.
# allkeys-lrm -> Evict any key using approximated LRM.
# volatile-random -> Remove a random key having an expire set.
# allkeys-random -> Remove a random key, any key.
# volatile-ttl -> Remove the key with the nearest expire time (minor TTL)
# noeviction -> Don't evict anything, just return an error on write operations.
#
# LRU means Least Recently Used
# LFU means Least Frequently Used
# LRM means Least Recently Modified (only write operations update the timestamp)
#
# LRU, LFU, LRM and volatile-ttl are implemented using approximated
# randomized algorithms.
#
# LRU vs LRM: Both use similar eviction logic based on access time, but:
# - LRU updates the timestamp on both read (GET) and write (SET) operations
# - LRM only updates the timestamp on write (SET, INCR, etc.) operations
# This makes LRM useful when you want to evict keys that haven't been updated
# recently, regardless of how often they are read.
#
# Note: with any of the above policies, when there are no suitable keys for
# eviction, Redis will return an error on write operations that require
# more memory. These are usually commands that create new keys, add data or
# modify existing keys. A few examples are: SET, INCR, HSET, LPUSH, SUNIONSTORE,
# SORT (due to the STORE argument), and EXEC (if the transaction includes any
# command that requires memory).
#
# The default is:
#
# maxmemory-policy noeviction
# LRU, LFU and minimal TTL algorithms are not precise algorithms but approximated
# algorithms (in order to save memory), so you can tune it for speed or
# accuracy. By default Redis will check five keys and pick the one that was
# used least recently, you can change the sample size using the following
# configuration directive.
#
# The default of 5 produces good enough results. 10 Approximates very closely
# true LRU but costs more CPU. 3 is faster but not very accurate. The maximum
# value that can be set is 64.
#
# maxmemory-samples 5
# Eviction processing is designed to function well with the default setting.
# If there is an unusually large amount of write traffic, this value may need to
# be increased. Decreasing this value may reduce latency at the risk of
# eviction processing effectiveness
# 0 = minimum latency, 10 = default, 100 = process without regard to latency
#
# maxmemory-eviction-tenacity 10
# Starting from Redis 5, by default a replica will ignore its maxmemory setting
# (unless it is promoted to master after a failover or manually). It means
# that the eviction of keys will be just handled by the master, sending the
# DEL commands to the replica as keys evict in the master side.
#
# This behavior ensures that masters and replicas stay consistent, and is usually
# what you want, however if your replica is writable, or you want the replica
# to have a different memory setting, and you are sure all the writes performed
# to the replica are idempotent, then you may change this default (but be sure
# to understand what you are doing).
#
# Note that since the replica by default does not evict, it may end using more
# memory than the one set via maxmemory (there are certain buffers that may
# be larger on the replica, or data structures may sometimes take more memory
# and so forth). So make sure you monitor your replicas and make sure they
# have enough memory to never hit a real out-of-memory condition before the
# master hits the configured maxmemory setting.
#
# replica-ignore-maxmemory yes
# Redis reclaims expired keys in two ways: upon access when those keys are
# found to be expired, and also in background, in what is called the
# "active expire key". The key space is slowly and interactively scanned
# looking for expired keys to reclaim, so that it is possible to free memory
# of keys that are expired and will never be accessed again in a short time.
#
# The default effort of the expire cycle will try to avoid having more than
# ten percent of expired keys still in memory, and will try to avoid consuming
# more than 25% of total memory and to add latency to the system. However
# it is possible to increase the expire "effort" that is normally set to
# "1", to a greater value, up to the value "10". At its maximum value the
# system will use more CPU, longer cycles (and technically may introduce
# more latency), and will tolerate less already expired keys still present
# in the system. It's a tradeoff between memory, CPU and latency.
#
# active-expire-effort 1
############################# LAZY FREEING ####################################
# Redis has two primitives to delete keys. One is called DEL and is a blocking
# deletion of the object. It means that the server stops processing new commands
# in order to reclaim all the memory associated with an object in a synchronous
# way. If the key deleted is associated with a small object, the time needed
# in order to execute the DEL command is very small and comparable to most other
# O(1) or O(log_N) commands in Redis. However if the key is associated with an
# aggregated value containing millions of elements, the server can block for
# a long time (even seconds) in order to complete the operation.
#
# For the above reasons Redis also offers non blocking deletion primitives
# such as UNLINK (non blocking DEL) and the ASYNC option of FLUSHALL and
# FLUSHDB commands, in order to reclaim memory in background. Those commands
# are executed in constant time. Another thread will incrementally free the
# object in the background as fast as possible.
#
# DEL, UNLINK and ASYNC option of FLUSHALL and FLUSHDB are user-controlled.
# It's up to the design of the application to understand when it is a good
# idea to use one or the other. However the Redis server sometimes has to
# delete keys or flush the whole database as a side effect of other operations.
# Specifically Redis deletes objects independently of a user call in the
# following scenarios:
#
# 1) On eviction, because of the maxmemory and maxmemory policy configurations,
# in order to make room for new data, without going over the specified
# memory limit.
# 2) Because of expire: when a key with an associated time to live (see the
# EXPIRE command) must be deleted from memory.
# 3) Because of a side effect of a command that stores data on a key that may
# already exist. For example the RENAME command may delete the old key
# content when it is replaced with another one. Similarly SUNIONSTORE
# or SORT with STORE option may delete existing keys. The SET command
# itself removes any old content of the specified key in order to replace
# it with the specified string.
# 4) During replication, when a replica performs a full resynchronization with
# its master, the content of the whole database is removed in order to
# load the RDB file just transferred.
#
# In all the above cases the default is to delete objects in a blocking way,
# like if DEL was called. However you can configure each case specifically
# in order to instead release memory in a non-blocking way like if UNLINK
# was called, using the following configuration directives.
lazyfree-lazy-eviction no
lazyfree-lazy-expire no
lazyfree-lazy-server-del no
replica-lazy-flush no
# It is also possible, for the case when to replace the user code DEL calls
# with UNLINK calls is not easy, to modify the default behavior of the DEL
# command to act exactly like UNLINK, using the following configuration
# directive:
lazyfree-lazy-user-del no
# FLUSHDB, FLUSHALL, SCRIPT FLUSH and FUNCTION FLUSH support both asynchronous and synchronous
# deletion, which can be controlled by passing the [SYNC|ASYNC] flags into the
# commands. When neither flag is passed, this directive will be used to determine
# if the data should be deleted asynchronously.
lazyfree-lazy-user-flush no
################################ THREADED I/O #################################
# Redis is mostly single threaded, however there are certain threaded
# operations such as UNLINK, slow I/O accesses and other things that are
# performed on side threads.
#
# Now it is also possible to handle Redis clients socket reads and writes
# in different I/O threads. Since especially writing is so slow, normally
# Redis users use pipelining in order to speed up the Redis performances per
# core, and spawn multiple instances in order to scale more. Using I/O
# threads it is possible to easily speedup several times Redis without resorting
# to pipelining nor sharding of the instance.
#
# By default threading is disabled, we suggest enabling it only in machines
# that have at least 4 or more cores, leaving at least one spare core.
# We also recommend using threaded I/O only if you actually have performance
# problems, with Redis instances being able to use a quite big percentage of
# CPU time, otherwise there is no point in using this feature.
#
# So for instance if you have a four cores boxes, try to use 3 I/O
# threads, if you have a 8 cores, try to use 7 threads. In order to
# enable I/O threads use the following configuration directive:
#
# io-threads 4
#
# Setting io-threads to 1 will just use the main thread as usual.
# When I/O threads are enabled, we not only use threads for writes, that
# is to thread the write(2) syscall and transfer the client buffers to the
# socket, but also use threads for reads and protocol parsing.
#
# NOTE: If you want to test the Redis speedup using redis-benchmark, make
# sure you also run the benchmark itself in threaded mode, using the
# --threads option to match the number of Redis threads, otherwise you'll not
# be able to notice the improvements.
############################ KERNEL OOM CONTROL ##############################
# On Linux, it is possible to hint the kernel OOM killer on what processes
# should be killed first when out of memory.
#
# Enabling this feature makes Redis actively control the oom_score_adj value
# for all its processes, depending on their role. The default scores will
# attempt to have background child processes killed before all others, and
# replicas killed before masters.
#
# Redis supports these options:
#
# no: Don't make changes to oom-score-adj (default).
# yes: Alias to "relative" see below.
# absolute: Values in oom-score-adj-values are written as is to the kernel.
# relative: Values are used relative to the initial value of oom_score_adj when
# the server starts and are then clamped to a range of -1000 to 1000.
# Because typically the initial value is 0, they will often match the
# absolute values.
oom-score-adj no
# When oom-score-adj is used, this directive controls the specific values used
# for master, replica and background child processes. Values range -2000 to
# 2000 (higher means more likely to be killed).
#
# Unprivileged processes (not root, and without CAP_SYS_RESOURCE capabilities)
# can freely increase their value, but not decrease it below its initial
# settings. This means that setting oom-score-adj to "relative" and setting the
# oom-score-adj-values to positive values will always succeed.
oom-score-adj-values 0 200 800
#################### KERNEL transparent hugepage CONTROL ######################
# Usually the kernel Transparent Huge Pages control is set to "madvise" or
# "never" by default (/sys/kernel/mm/transparent_hugepage/enabled), in which
# case this config has no effect. On systems in which it is set to "always",
# redis will attempt to disable it specifically for the redis process in order
# to avoid latency problems specifically with fork(2) and CoW.
# If for some reason you prefer to keep it enabled, you can set this config to
# "no" and the kernel global to "always".
disable-thp yes
############################## APPEND ONLY MODE ###############################
# By default Redis asynchronously dumps the dataset on disk. This mode is
# good enough in many applications, but an issue with the Redis process or
# a power outage may result into a few minutes of writes lost (depending on
# the configured save points).
#
# The Append Only File is an alternative persistence mode that provides
# much better durability. For instance using the default data fsync policy
# (see later in the config file) Redis can lose just one second of writes in a
# dramatic event like a server power outage, or a single write if something
# wrong with the Redis process itself happens, but the operating system is
# still running correctly.
#
# AOF and RDB persistence can be enabled at the same time without problems.
# If the AOF is enabled on startup Redis will load the AOF, that is the file
# with the better durability guarantees.
#
# Note that changing this value in a config file of an existing database and
# restarting the server can lead to data loss. A conversion needs to be done
# by setting it via CONFIG command on a live server first.
#
# Please check https://redis.io/docs/latest/operate/oss_and_stack/management/persistence/ for more information.
appendonly no
# The base name of the append only file.
#
# Redis 7 and newer use a set of append-only files to persist the dataset
# and changes applied to it. There are two basic types of files in use:
#
# - Base files, which are a snapshot representing the complete state of the
# dataset at the time the file was created. Base files can be either in
# the form of RDB (binary serialized) or AOF (textual commands).
# - Incremental files, which contain additional commands that were applied
# to the dataset following the previous file.
#
# In addition, manifest files are used to track the files and the order in
# which they were created and should be applied.
#
# Append-only file names are created by Redis following a specific pattern.
# The file name's prefix is based on the 'appendfilename' configuration
# parameter, followed by additional information about the sequence and type.
#
# For example, if appendfilename is set to appendonly.aof, the following file
# names could be derived:
#
# - appendonly.aof.1.base.rdb as a base file.
# - appendonly.aof.1.incr.aof, appendonly.aof.2.incr.aof as incremental files.
# - appendonly.aof.manifest as a manifest file.
appendfilename "appendonly.aof"
# For convenience, Redis stores all persistent append-only files in a dedicated
# directory. The name of the directory is determined by the appenddirname
# configuration parameter.
appenddirname "appendonlydir"
# The fsync() call tells the Operating System to actually write data on disk
# instead of waiting for more data in the output buffer. Some OS will really flush
# data on disk, some other OS will just try to do it ASAP.
#
# Redis supports three different modes:
#
# no: don't fsync, just let the OS flush the data when it wants. Faster.
# always: fsync after every write to the append only log. Slow, Safest.
# everysec: fsync only one time every second. Compromise.
#
# The default is "everysec", as that's usually the right compromise between
# speed and data safety. It's up to you to understand if you can relax this to
# "no" that will let the operating system flush the output buffer when
# it wants, for better performances (but if you can live with the idea of
# some data loss consider the default persistence mode that's snapshotting),
# or on the contrary, use "always" that's very slow but a bit safer than
# everysec.
#
# More details please check the following article:
# http://antirez.com/post/redis-persistence-demystified.html
#
# If unsure, use "everysec".
# appendfsync always
appendfsync everysec
# appendfsync no
# When the AOF fsync policy is set to always or everysec, and a background
# saving process (a background save or AOF log background rewriting) is
# performing a lot of I/O against the disk, in some Linux configurations
# Redis may block too long on the fsync() call. Note that there is no fix for
# this currently, as even performing fsync in a different thread will block
# our synchronous write(2) call.
#
# In order to mitigate this problem it's possible to use the following option
# that will prevent fsync() from being called in the main process while a
# BGSAVE or BGREWRITEAOF is in progress.
#
# This means that while another child is saving, the durability of Redis is
# the same as "appendfsync no". In practical terms, this means that it is
# possible to lose up to 30 seconds of log in the worst scenario (with the
# default Linux settings).
#
# If you have latency problems turn this to "yes". Otherwise leave it as
# "no" that is the safest pick from the point of view of durability.
no-appendfsync-on-rewrite no
# Automatic rewrite of the append only file.
# Redis is able to automatically rewrite the log file implicitly calling
# BGREWRITEAOF when the AOF log size grows by the specified percentage.
#
# This is how it works: Redis remembers the size of the AOF file after the
# latest rewrite (if no rewrite has happened since the restart, the size of
# the AOF at startup is used).
#
# This base size is compared to the current size. If the current size is
# bigger than the specified percentage, the rewrite is triggered. Also
# you need to specify a minimal size for the AOF file to be rewritten, this
# is useful to avoid rewriting the AOF file even if the percentage increase
# is reached but it is still pretty small.
#
# Specify a percentage of zero in order to disable the automatic AOF
# rewrite feature.
auto-aof-rewrite-percentage 100
auto-aof-rewrite-min-size 64mb
# An AOF file may be found to be truncated at the end during the Redis
# startup process, when the AOF data gets loaded back into memory.
# This may happen when the system where Redis is running
# crashes, especially when an ext4 filesystem is mounted without the
# data=ordered option (however this can't happen when Redis itself
# crashes or aborts but the operating system still works correctly).
#
# Redis can either exit with an error when this happens, or load as much
# data as possible (the default now) and start if the AOF file is found
# to be truncated at the end. The following option controls this behavior.
#
# If aof-load-truncated is set to yes, a truncated AOF file is loaded and
# the Redis server starts emitting a log to inform the user of the event.
# Otherwise if the option is set to no, the server aborts with an error
# and refuses to start. When the option is set to no, the user requires
# to fix the AOF file using the "redis-check-aof" utility before to restart
# the server.
#
# Note that if the AOF file will be found to be corrupted in the middle
# the server will still exit with an error. This option only applies when
# Redis will try to read more data from the AOF file but not enough bytes
# will be found.
aof-load-truncated yes
# An AOF file may be found to be corrupted at the end during the Redis
# startup process, when the AOF data gets loaded back into memory.
# This may happen when the system where Redis is running crashes.
#
# The aof-load-corrupt-tail-max-size option allows Redis to automatically recover
# from small amounts of corruption at the end of the AOF file by truncating the
# corrupted portion and continuing with startup.
#
# Set this to the maximum number of bytes of corruption you're willing to
# lose from the end of the AOF file. If the corrupted portion is larger than
# this value, Redis will refuse to start and require manual intervention.
#
# Setting this to 0 (default) disables automatic recovery from corruption.
# Redis will exit with an error and suggest using redis-check-aof --fix.
#
# Note: This is different from aof-load-truncated, which handles missing data
# (unexpected EOF) rather than corrupted data (format errors).
# aof-load-corrupt-tail-max-size 4096
# Redis can create append-only base files in either RDB or AOF formats. Using
# the RDB format is always faster and more efficient, and disabling it is only
# supported for backward compatibility purposes.
aof-use-rdb-preamble yes
# Redis supports recording timestamp annotations in the AOF to support restoring
# the data from a specific point-in-time. However, using this capability changes
# the AOF format in a way that may not be compatible with existing AOF parsers.
aof-timestamp-enabled no
############################### BACKUP / RESTORE ##############################
# BACKUP creates a restorable MP-AOF file set under the Redis working directory.
# The backup directory name is configured by backupdirname. It must be a
# directory name only, not an absolute path or a nested path. For example, with:
#
# dir /var/lib/redis
# backupdirname backupdir
#
# BACKUP writes its files under /var/lib/redis/backupdir.
#
# The directory must be empty when BACKUP START is called. After BACKUP SEAL,
# the directory contains the immutable BASE, INCR, and manifest files until
# BACKUP CLEANUP removes them.
# backupdirname is a startup-only setting and cannot be changed with CONFIG SET.
backupdirname "backupdir"
# How long Redis keeps a sealed backup before automatically cleaning it up.
# The value is in seconds. A value of 0 disables automatic cleanup, so the
# backup files remain pinned until BACKUP CLEANUP is called explicitly.
#
# The default is 0 because the external backup process may need time to upload
# or copy the sealed files.
backup-sealed-ttl 0
# preload-file can load an RDB file, an AOF file, or an AOF manifest and its
# referenced files during server startup. The value is specified as
#
#
# To restore a sealed backup created by BACKUP, specify its manifest:
#
# preload-file aof:/tmp/restore-backup/appendonly.aof.manifest
#
# To load an RDB file:
#
# preload-file rdb:/tmp/backup-to-recover.rdb
#
# To load a single AOF file:
#
# preload-file aof:/tmp/appendonly.aof
#
# When preload-file is set, Redis loads only the specified file or manifest and
# its associated files. It skips normal appendonlydir and dump.rdb loading even
# if AOF or RDB persistence is enabled. If the preload target is missing or
# cannot be loaded, startup aborts.
################################ SHUTDOWN #####################################
# Maximum time to wait for replicas when shutting down, in seconds.
#
# During shut down, a grace period allows any lagging replicas to catch up with
# the latest replication offset before the master exists. This period can
# prevent data loss, especially for deployments without configured disk backups.
#
# The 'shutdown-timeout' value is the grace period's duration in seconds. It is
# only applicable when the instance has replicas. To disable the feature, set
# the value to 0.
#
# shutdown-timeout 10
# When Redis receives a SIGINT or SIGTERM, shutdown is initiated and by default
# an RDB snapshot is written to disk in a blocking operation if save points are configured.
# The options used on signaled shutdown can include the following values:
# default: Saves RDB snapshot only if save points are configured.
# Waits for lagging replicas to catch up.
# save: Forces a DB saving operation even if no save points are configured.
# nosave: Prevents DB saving operation even if one or more save points are configured.
# now: Skips waiting for lagging replicas.
# force: Ignores any errors that would normally prevent the server from exiting.
#
# Any combination of values is allowed as long as "save" and "nosave" are not set simultaneously.
# Example: "nosave force now"
#
# shutdown-on-sigint default
# shutdown-on-sigterm default
################ NON-DETERMINISTIC LONG BLOCKING COMMANDS #####################
# Maximum time in milliseconds for EVAL scripts, functions and in some cases
# modules' commands before Redis can start processing or rejecting other clients.
#
# If the maximum execution time is reached Redis will start to reply to most
# commands with a BUSY error.
#
# In this state Redis will only allow a handful of commands to be executed.
# For instance, SCRIPT KILL, FUNCTION KILL, SHUTDOWN NOSAVE and possibly some
# module specific 'allow-busy' commands.
#
# SCRIPT KILL and FUNCTION KILL will only be able to stop a script that did not
# yet call any write commands, so SHUTDOWN NOSAVE may be the only way to stop
# the server in the case a write command was already issued by the script when
# the user doesn't want to wait for the natural termination of the script.
#
# The default is 5 seconds. It is possible to set it to 0 or a negative value
# to disable this mechanism (uninterrupted execution). Note that in the past
# this config had a different name, which is now an alias, so both of these do
# the same:
# lua-time-limit 5000
# busy-reply-threshold 5000
################################ REDIS CLUSTER ###############################
# Normal Redis instances can't be part of a Redis Cluster; only nodes that are
# started as cluster nodes can. In order to start a Redis instance as a
# cluster node enable the cluster support uncommenting the following:
#
# cluster-enabled yes
# Every cluster node has a cluster configuration file. This file is not
# intended to be edited by hand. It is created and updated by Redis nodes.
# Every Redis Cluster node requires a different cluster configuration file.
# Make sure that instances running in the same system do not have
# overlapping cluster configuration file names.
#
# cluster-config-file nodes-6379.conf
# Cluster node timeout is the amount of milliseconds a node must be unreachable
# for it to be considered in failure state.
# Most other internal time limits are a multiple of the node timeout.
#
# cluster-node-timeout 15000
# The cluster port is the port that the cluster bus will listen for inbound connections on. When set
# to the default value, 0, it will be bound to the command port + 10000. Setting this value requires
# you to specify the cluster bus port when executing cluster meet.
# cluster-port 0
# A replica of a failing master will avoid to start a failover if its data
# looks too old.
#
# There is no simple way for a replica to actually have an exact measure of
# its "data age", so the following two checks are performed:
#
# 1) If there are multiple replicas able to failover, they exchange messages
# in order to try to give an advantage to the replica with the best
# replication offset (more data from the master processed).
# Replicas will try to get their rank by offset, and apply to the start
# of the failover a delay proportional to their rank.
#
# 2) Every single replica computes the time of the last interaction with
# its master. This can be the last ping or command received (if the master
# is still in the "connected" state), or the time that elapsed since the
# disconnection with the master (if the replication link is currently down).
# If the last interaction is too old, the replica will not try to failover
# at all.
#
# The point "2" can be tuned by user. Specifically a replica will not perform
# the failover if, since the last interaction with the master, the time
# elapsed is greater than:
#
# (node-timeout * cluster-replica-validity-factor) + repl-ping-replica-period
#
# So for example if node-timeout is 30 seconds, and the cluster-replica-validity-factor
# is 10, and assuming a default repl-ping-replica-period of 10 seconds, the
# replica will not try to failover if it was not able to talk with the master
# for longer than 310 seconds.
#
# A large cluster-replica-validity-factor may allow replicas with too old data to failover
# a master, while a too small value may prevent the cluster from being able to
# elect a replica at all.
#
# For maximum availability, it is possible to set the cluster-replica-validity-factor
# to a value of 0, which means, that replicas will always try to failover the
# master regardless of the last time they interacted with the master.
# (However they'll always try to apply a delay proportional to their
# offset rank).
#
# Zero is the only value able to guarantee that when all the partitions heal
# the cluster will always be able to continue.
#
# cluster-replica-validity-factor 10
# Cluster replicas are able to migrate to orphaned masters, that are masters
# that are left without working replicas. This improves the cluster ability
# to resist to failures as otherwise an orphaned master can't be failed over
# in case of failure if it has no working replicas.
#
# Replicas migrate to orphaned masters only if there are still at least a
# given number of other working replicas for their old master. This number
# is the "migration barrier". A migration barrier of 1 means that a replica
# will migrate only if there is at least 1 other working replica for its master
# and so forth. It usually reflects the number of replicas you want for every
# master in your cluster.
#
# Default is 1 (replicas migrate only if their masters remain with at least
# one replica). To disable migration just set it to a very large value or
# set cluster-allow-replica-migration to 'no'.
# A value of 0 can be set but is useful only for debugging and dangerous
# in production.
#
# cluster-migration-barrier 1
# Turning off this option allows to use less automatic cluster configuration.
# It both disables migration to orphaned masters and migration from masters
# that became empty.
#
# Default is 'yes' (allow automatic migrations).
#
# cluster-allow-replica-migration yes
# By default Redis Cluster nodes stop accepting queries if they detect there
# is at least a hash slot uncovered (no available node is serving it).
# This way if the cluster is partially down (for example a range of hash slots
# are no longer covered) all the cluster becomes, eventually, unavailable.
# It automatically returns available as soon as all the slots are covered again.
#
# However sometimes you want the subset of the cluster which is working,
# to continue to accept queries for the part of the key space that is still
# covered. In order to do so, just set the cluster-require-full-coverage
# option to no.
#
# cluster-require-full-coverage yes
# This option, when set to yes, prevents replicas from trying to failover its
# master during master failures. However the replica can still perform a
# manual failover, if forced to do so.
#
# This is useful in different scenarios, especially in the case of multiple
# data center operations, where we want one side to never be promoted if not
# in the case of a total DC failure.
#
# cluster-replica-no-failover no
# This option, when set to yes, allows nodes to serve read traffic while the
# cluster is in a down state, as long as it believes it owns the slots.
#
# This is useful for two cases. The first case is for when an application
# doesn't require consistency of data during node failures or network partitions.
# One example of this is a cache, where as long as the node has the data it
# should be able to serve it.
#
# The second use case is for configurations that don't meet the recommended
# three shards but want to enable cluster mode and scale later. A
# master outage in a 1 or 2 shard configuration causes a read/write outage to the
# entire cluster without this option set, with it set there is only a write outage.
# Without a quorum of masters, slot ownership will not change automatically.
#
# cluster-allow-reads-when-down no
# This option, when set to yes, allows nodes to serve pubsub shard traffic while
# the cluster is in a down state, as long as it believes it owns the slots.
#
# This is useful if the application would like to use the pubsub feature even when
# the cluster global stable state is not OK. If the application wants to make sure only
# one shard is serving a given channel, this feature should be kept as yes.
#
# cluster-allow-pubsubshard-when-down yes
# Cluster link send buffer limit is the limit on the memory usage of an individual
# cluster bus link's send buffer in bytes. Cluster links would be freed if they exceed
# this limit. This is to primarily prevent send buffers from growing unbounded on links
# toward slow peers (E.g. PubSub messages being piled up).
# This limit is disabled by default. Enable this limit when 'mem_cluster_links' INFO field
# and/or 'send-buffer-allocated' entries in the 'CLUSTER LINKS` command output continuously increase.
# Minimum limit of 1gb is recommended so that cluster link buffer can fit in at least a single
# PubSub message by default. (client-query-buffer-limit default value is 1gb)
#
# cluster-link-sendbuf-limit 0
# Clusters can configure their announced hostname using this config. This is a common use case for
# applications that need to use TLS Server Name Indication (SNI) or dealing with DNS based
# routing. By default this value is only shown as additional metadata in the CLUSTER SLOTS
# command, but can be changed using 'cluster-preferred-endpoint-type' config. This value is
# communicated along the clusterbus to all nodes, setting it to an empty string will remove
# the hostname and also propagate the removal.
#
# cluster-announce-hostname ""
# Clusters can configure an optional nodename to be used in addition to the node ID for
# debugging and admin information. This name is broadcasted between nodes, so will be used
# in addition to the node ID when reporting cross node events such as node failures.
# cluster-announce-human-nodename ""
# Clusters can advertise how clients should connect to them using either their IP address,
# a user defined hostname, or by declaring they have no endpoint. Which endpoint is
# shown as the preferred endpoint is set by using the cluster-preferred-endpoint-type
# config with values 'ip', 'hostname', or 'unknown-endpoint'. This value controls how
# the endpoint returned for MOVED/ASKING requests as well as the first field of CLUSTER SLOTS.
# If the preferred endpoint type is set to hostname, but no announced hostname is set, a '?'
# will be returned instead.
#
# When a cluster advertises itself as having an unknown endpoint, it's indicating that
# the server doesn't know how clients can reach the cluster. This can happen in certain
# networking situations where there are multiple possible routes to the node, and the
# server doesn't know which one the client took. In this case, the server is expecting
# the client to reach out on the same endpoint it used for making the last request, but use
# the port provided in the response.
#
# cluster-preferred-endpoint-type ip
# This configuration defines the sampling ratio (0-100) for checking command
# compatibility in cluster mode. When a command is executed, it is sampled at
# the specified ratio to determine if it complies with Redis cluster constraints,
# such as cross-slot restrictions.
#
# - A value of 0 means no commands are sampled for compatibility checks.
# - A value of 100 means all commands are checked.
# - Intermediate values (e.g., 10) mean that approximately 10% of the commands
# are randomly selected for compatibility verification.
#
# Higher sampling ratios may introduce additional performance overhead, especially
# under high QPS. The default value is 0 (no sampling).
#
# cluster-compatibility-sample-ratio 0
# Clusters can be configured to track per-slot resource statistics,
# which are accessible by the CLUSTER SLOT-STATS command.
#
# By default, the 'cluster-slot-stats-enabled' is disabled, and only 'key-count' is captured.
# By enabling the 'cluster-slot-stats-enabled' config, the cluster will begin to capture advanced statistics.
# These statistics can be leveraged to assess general slot usage trends, identify hot / cold slots,
# migrate slots for a balanced cluster workload, and / or re-write application logic to better utilize slots.
#
# The config accepts multiple values as a space-separated list:
# - cpu: Track CPU usage per slot (cpu-usec metric)
# - net: Track network bytes per slot (network-bytes-in, network-bytes-out metrics)
# - mem: Track memory usage per slot (memory-bytes metric)
# - yes: Enable all tracking (equivalent to "cpu net mem")
# - no: Disable all tracking (default)
#
# Example: cluster-slot-stats-enabled "cpu net"
#
# Note: Memory tracking (mem) can ONLY be enabled at startup. If you try to enable
# memory tracking via CONFIG SET when it wasn't enabled at startup, the command will
# fail. However, you can disable memory tracking at runtime by removing the 'mem' flag.
# Once disabled, memory tracking cannot be re-enabled without restarting the server.
#
# cluster-slot-stats-enabled no
# Slot migration write pause timeout controls how long the source node will
# pause write operations during slot migration handoff phase. This usually
# finishes in a few milliseconds, depending on traffic and load. When the source
# node pauses writes to allow the destination to catch up and take the ownership
# of the slots, this timeout prevents writes from being blocked indefinitely.
#
# If the destination node fails to complete the slot ownership takeover within
# this timeout, the source node will resume accepting writes and assume the
# migration task is failed. This prevents the source node from being permanently
# blocked if the destination node becomes unresponsive or fails during migration.
#
# If this timeout is set too low, the source may resume writes and assume that
# the slot migration has failed while the destination is still in the process of
# draining the replication stream and publishing the configuration update.
# During this window, writes accepted by the source will not be replicated to
# the destination; if the destination later publishes the updated config and
# takes ownership, those writes could be lost. Therefore, avoid setting this
# timeout too low.
#
# This timeout is specified in milliseconds.
#
# cluster-slot-migration-write-pause-timeout 10000
# This config controls the maximum acceptable lag in bytes between source and
# destination nodes during slot migration before triggering the slot handoff
# phase. If the remaining replication stream size falls below this threshold,
# the source node pauses writes and then signals destination that it can take
# over the slot ownership after draining the remaining replication stream.
#
# A smaller value means potentially shorter write pause duration, but it may
# take longer for the destination to catch up. A larger value means handoff can
# be triggered earlier, but the write pause may potentially be longer.
#
# cluster-slot-migration-handoff-max-lag-bytes 1mb
# In order to setup your cluster make sure to read the documentation
# available at https://redis.io web site.
########################## CLUSTER DOCKER/NAT support ########################
# In certain deployments, Redis Cluster nodes address discovery fails, because
# addresses are NAT-ted or because ports are forwarded (the typical case is
# Docker and other containers).
#
# In order to make Redis Cluster working in such environments, a static
# configuration where each node knows its public address is needed. The
# following four options are used for this scope, and are:
#
# * cluster-announce-ip
# * cluster-announce-port
# * cluster-announce-tls-port
# * cluster-announce-bus-port
#
# Each instructs the node about its address, client ports (for connections
# without and with TLS) and cluster message bus port. The information is then
# published in the header of the bus packets so that other nodes will be able to
# correctly map the address of the node publishing the information.
#
# If tls-cluster is set to yes and cluster-announce-tls-port is omitted or set
# to zero, then cluster-announce-port refers to the TLS port. Note also that
# cluster-announce-tls-port has no effect if tls-cluster is set to no.
#
# If the above options are not used, the normal Redis Cluster auto-detection
# will be used instead.
#
# Note that when remapped, the bus port may not be at the fixed offset of
# clients port + 10000, so you can specify any port and bus-port depending
# on how they get remapped. If the bus-port is not set, a fixed offset of
# 10000 will be used as usual.
#
# Example:
#
# cluster-announce-ip 10.1.1.5
# cluster-announce-tls-port 6379
# cluster-announce-port 0
# cluster-announce-bus-port 6380
################################## SLOW LOG ###################################
# The Redis Slow Log is a system to log queries that exceeded a specified
# execution time. The execution time does not include the I/O operations
# like talking with the client, sending the reply and so forth,
# but just the time needed to actually execute the command (this is the only
# stage of command execution where the thread is blocked and can not serve
# other requests in the meantime).
#
# You can configure the slow log with two parameters: one tells Redis
# what is the execution time, in microseconds, to exceed in order for the
# command to get logged, and the other parameter is the length of the
# slow log. When a new command is logged the oldest one is removed from the
# queue of logged commands.
# The following time is expressed in microseconds, so 1000000 is equivalent
# to one second. Note that a negative number disables the slow log, while
# a value of zero forces the logging of every command.
slowlog-log-slower-than 10000
# There is no limit to this length. Just be aware that it will consume memory.
# You can reclaim memory used by the slow log with SLOWLOG RESET.
slowlog-max-len 128
# When a command is written to the slowlog we check how many arguments it has
# and if it has more than slowlog-entry-max-argc we trim the excess ones. The
# last of the non-trimmed arguments is overwritten with an info string about
# how many args were trimmed. That's why slowlog-entry-max-argc has minimum
# value of 2, so we can always preserve the command name.
# Moreover, each individual argument string is also trimmed depending on
# slowlog-entry-max-string-len. Default values:
#
# slowlog-entry-max-argc 32
# slowlog-entry-max-string-len 128
################################ LATENCY MONITOR ##############################
# The Redis latency monitoring subsystem samples different operations
# at runtime in order to collect data related to possible sources of
# latency of a Redis instance.
#
# Via the LATENCY command this information is available to the user that can
# print graphs and obtain reports.
#
# The system only logs operations that were performed in a time equal or
# greater than the amount of milliseconds specified via the
# latency-monitor-threshold configuration directive. When its value is set
# to zero, the latency monitor is turned off.
#
# By default latency monitoring is disabled since it is mostly not needed
# if you don't have latency issues, and collecting data has a performance
# impact, that while very small, can be measured under big load. Latency
# monitoring can easily be enabled at runtime using the command
# "CONFIG SET latency-monitor-threshold
latency-monitor-threshold 0
################################ LATENCY TRACKING ##############################
# The Redis extended latency monitoring tracks the per command latencies and enables
# exporting the percentile distribution via the INFO latencystats command,
# and cumulative latency distributions (histograms) via the LATENCY command.
#
# By default, the extended latency monitoring is enabled since the overhead
# of keeping track of the command latency is very small.
# latency-tracking yes
# By default the exported latency percentiles via the INFO latencystats command
# are the p50, p99, and p999.
# latency-tracking-info-percentiles 50 99 99.9
############################# EVENT NOTIFICATION ##############################
# Redis can notify Pub/Sub clients about events happening in the key space.
# This feature is documented at https://redis.io/docs/latest/develop/use/keyspace-notifications/
#
# For instance if keyspace events notification is enabled, and a client
# performs a DEL operation on key "foo" stored in the Database 0, two
# messages will be published via Pub/Sub:
#
# PUBLISH __keyspace@0__:foo del
# PUBLISH __keyevent@0__:del foo
#
# It is possible to select the events that Redis will notify among a set
# of classes. Every class is identified by a single character:
#
# K Keyspace events, published with __keyspace@
# E Keyevent events, published with __keyevent@
# g Generic commands (non-type specific) like DEL, EXPIRE, RENAME, ...
# $ String commands
# l List commands
# s Set commands
# h Hash commands
# z Sorted set commands
# x Expired events (events generated every time a key expires)
# e Evicted events (events generated when a key is evicted for maxmemory)
# n New key events (Note: not included in the 'A' class)
# t Stream commands
# a Array commands
# d Module key type events
# m Key-miss events (Note: It is not included in the 'A' class)
# o Overwritten events generated every time a key is overwritten.
# (Note: not included in the 'A' class)
# c Type-changed events generated every time a key's type changes
# (Note: not included in the 'A' class)
# S Subkeyspace events, published with __subkeyspace@
# T Subkeyevent events, published with __subkeyevent@
# I Subkeyspaceitem events, published per subkey with
# __subkeyspaceitem@
# V Subkeyspaceevent events, published with
# __subkeyspaceevent@
# A Alias for g$lshzxetad, so that the "AKE" string means all the events
# except key-miss, new key, overwritten and type-changed.
#
# The "notify-keyspace-events" takes as argument a string that is composed
# of zero or multiple characters. The empty string means that notifications
# are disabled.
#
# Example: to enable list and generic events, from the point of view of the
# event name, use:
#
# notify-keyspace-events Elg
#
# Example 2: to get the stream of the expired keys subscribing to channel
# name __keyevent@0__:expired use:
#
# notify-keyspace-events Ex
#
# By default all notifications are disabled because most users don't need
# this feature and the feature has some overhead. Note that if you don't
# specify at least one of K or E, no events will be delivered.
notify-keyspace-events ""
############################### ADVANCED CONFIG ###############################
# Hashes are encoded using a memory efficient data structure when they have a
# small number of entries, and the biggest entry does not exceed a given
# threshold. These thresholds can be configured using the following directives.
hash-max-listpack-entries 512
hash-max-listpack-value 64
# Hashes that share the same set of field names can store those names once in a
# shared template instead of repeating them in every key, saving memory when
# many hashes use the same field set. A hash with at least this many fields is
# automatically converted to the template encoding on write. Hashes that use
# field expiration (e.g. HEXPIRE) are never converted, since templates target
# stable field sets. The default 0 disables automatic conversion.
#
# Conversion is one-way: once a hash uses the template encoding it keeps it for
# the life of the key, even if fields are later removed (e.g. via HDEL) and the
# count drops back below the threshold. Changing this directive at runtime is
# applied lazily: it only affects a key on its next write (e.g. HSET); existing
# templates are never converted back.
#
# Template encoding pays off when many keys share a field set that stays mostly
# stable. Adding or removing a field name moves the key to a different template,
# so a workload that frequently changes field names pays a template lookup or
# creation on every such write instead of saving memory.
hash-min-template-entries 0
# Upper bound for automatic template conversion. A hash with more fields than
# this is not converted to the template encoding, even if it meets
# hash-min-template-entries. This is useful to keep very wide hashes out of the
# shared template registry. The default 0 disables the upper bound. Like the
# minimum, this is applied lazily on the next write and never converts existing
# templates back.
hash-max-template-entries 0
# The two directives above convert hashes on the write path (HSET and friends).
# The two below convert hashes while an RDB is being loaded. They only do
# something when the RDB has no templates in it; if the RDB already contains
# templates, it is loaded as is and these are ignored. So this is a one-time
# conversion that lets an old RDB (saved before templates existed) gain the
# memory savings on load. This is mainly because of the
# hash-rdb-load-template-disassembly-threshold configuration described below,
# which allows Redis to disassemble inefficient templates. Limiting the
# conversion to the initial upgrade avoids repeatedly assembling and
# disassembling templates on every restart.
#
# While such an RDB loads, a plain hash is converted to a template when its
# field count is at least the minimum (and at most the maximum, if the maximum
# is non-zero). Hashes that use field expiration (e.g. HEXPIRE) are never
# converted. The default 0 disables this (and the maximum bound); a hash that
# would have qualified is left plain and may instead be converted later, on its
# next write, per hash-min-template-entries above.
hash-rdb-load-min-template-entries 0
hash-rdb-load-max-template-entries 0
# A template shared by only a few keys costs more memory than it saves. After
# the load-time conversion above, this is the minimum number of keys a template
# must have to be kept: at the end of the load, any template used by fewer keys
# than this is broken back into plain hashes.
#
# Safety valve: while loading, Redis tracks how many templates have fewer keys
# than this threshold. Once at least 1000 templates have been created, if more
# than half of them are still below the threshold, Redis assumes that an RDB
# with many distinct field sets, each used by only a few keys, is a poor fit for
# templates and stops creating new templates partway through the load. From that
# point, only hashes whose field set matches a template already created during
# this load are template-encoded; the rest stay plain. If that happens, keys
# will be partially converted to templates.
#
# Like the two above, this applies only when loading an RDB that has no
# templates. The default 0 disables it, keeping every template the load created.
hash-rdb-load-template-disassembly-threshold 0
# Lists are also encoded in a special way to save a lot of space.
# The number of entries allowed per internal list node can be specified
# as a fixed maximum size or a maximum number of elements.
# For a fixed maximum size, use -5 through -1, meaning:
# -5: max size: 64 Kb <-- not recommended for normal workloads
# -4: max size: 32 Kb <-- not recommended
# -3: max size: 16 Kb <-- probably not recommended
# -2: max size: 8 Kb <-- good
# -1: max size: 4 Kb <-- good
# Positive numbers mean store up to _exactly_ that number of elements
# per list node.
# The highest performing option is usually -2 (8 Kb size) or -1 (4 Kb size),
# but if your use case is unique, adjust the settings as necessary.
list-max-listpack-size -2
# Lists may also be compressed.
# Compress depth is the number of quicklist ziplist nodes from *each* side of
# the list to *exclude* from compression. The head and tail of the list
# are always uncompressed for fast push/pop operations. Settings are:
# 0: disable all list compression
# 1: depth 1 means "don't start compressing until after 1 node into the list,
# going from either the head or tail"
# So: [head]->node->node->...->node->[tail]
# [head], [tail] will always be uncompressed; inner nodes will compress.
# 2: [head]->[next]->node->node->...->node->[prev]->[tail]
# 2 here means: don't compress head or head->next or tail->prev or tail,
# but compress all nodes between them.
# 3: [head]->[next]->[next]->node->node->...->node->[prev]->[prev]->[tail]
# etc.
list-compress-depth 0
# Sets have a special encoding when a set is composed
# of just strings that happen to be integers in radix 10 in the range
# of 64 bit signed integers.
# The following configuration setting sets the limit in the size of the
# set in order to use this special memory saving encoding.
set-max-intset-entries 512
# Sets containing non-integer values are also encoded using a memory efficient
# data structure when they have a small number of entries, and the biggest entry
# does not exceed a given threshold. These thresholds can be configured using
# the following directives.
set-max-listpack-entries 128
set-max-listpack-value 64
# Similarly to hashes and lists, sorted sets are also specially encoded in
# order to save a lot of space. This encoding is only used when the length and
# elements of a sorted set are below the following limits:
zset-max-listpack-entries 128
zset-max-listpack-value 64
# HyperLogLog sparse representation bytes limit. The limit includes the
# 16 bytes header. When a HyperLogLog using the sparse representation crosses
# this limit, it is converted into the dense representation.
#
# A value greater than 16000 is totally useless, since at that point the
# dense representation is more memory efficient.
#
# The suggested value is ~ 3000 in order to have the benefits of
# the space efficient encoding without slowing down too much PFADD,
# which is O(N) with the sparse encoding. The value can be raised to
# ~ 10000 when CPU is not a concern, but space is, and the data set is
# composed of many HyperLogLogs with cardinality in the 0 - 15000 range.
hll-sparse-max-bytes 3000
# Streams macro node max size / items. The stream data structure is a radix
# tree of big nodes that encode multiple items inside. Using this configuration
# it is possible to configure how big a single node can be in bytes, and the
# maximum number of items it may contain before switching to a new node when
# appending new stream entries. If any of the following settings are set to
# zero, the limit is ignored, so for instance it is possible to set just a
# max entries limit by setting max-bytes to 0 and max-entries to the desired
# value.
stream-node-max-bytes 4096
stream-node-max-entries 100
# Redis Streams support Idempotent Message Producer (IDMP) tracking to prevent
# duplicate message delivery. When producers send messages with IDMP identifiers
# (using XADD with IDMP or IDMPAUTO parameters), Redis tracks these identifiers to
# detect and reject duplicates within a configurable time window.
#
# stream-idmp-duration: Specifies how long (in seconds) Redis should remember
# IDMP identifiers for duplicate detection. After this duration expires, old
# identifiers are automatically removed. This prevents unbounded memory growth
# while allowing reasonable duplicate detection windows.
# Valid range: 1 to 86400 seconds (1 second to 24 hours)
# Default: 100 seconds
#
# stream-idmp-maxsize: Maximum number of IDMP identifiers to track per producer
# per stream. Once this limit is reached, the oldest identifiers are evicted to
# make room for new ones. This caps memory usage for IDMP tracking.
# Valid range: 1 to 10000 entries
# Default: 100 entries
#
# Note: These are default values for new streams. Individual streams can override
# these settings using the XCFGSET command.
#
# stream-idmp-duration 100
# stream-idmp-maxsize 100
# Arrays use a sliced directory structure for O(1) access. The slice size
# controls the granularity of memory allocation - each slice covers a range
# of indices. Must be a power of two between 256 and 65536.
#
# Smaller slices (1024-2048): Better for sparse data with large gaps between
# indices, or many small arrays. Uses less memory per slice but more directory
# entries.
#
# Larger slices (8192-16384): Better for dense/contiguous data. Fewer directory
# entries but may waste memory if data is sparse within slices.
#
# Default 4096 works well for mixed workloads. If you change this setting via
# CONFIG SET, existing arrays retain their original slice size.
#
# IMPORTANT CONSIDERATION: Redis arrays, for slices with very few elements, are
# able to use a sparse representation, where the slice is not really
# materialized into an actual contiguous allocation. See the next configuration
# parameters for more information.
array-slice-size 4096
# Arrays start with sparse slices (sorted key-value pairs) for memory efficiency
# when elements are scattered. When a sparse slice exceeds array-sparse-kmax
# entries, it promotes to a dense slice (direct array). When a dense slice's
# element count drops below array-sparse-kmin and demotion would save memory,
# it demotes back to sparse. Set kmax to 0 to disable sparse encoding entirely.
# Set kmin to 0 if you never want dense slices to be demoted to sparse (useful
# when in your work load arrays reach an almost empty state to be filled again
# and so forth).
array-sparse-kmax 10
array-sparse-kmin 5
# Active rehashing uses 1 millisecond every 100 milliseconds of CPU time in
# order to help rehashing the main Redis hash table (the one mapping top-level
# keys to values). The hash table implementation Redis uses (see dict.c)
# performs a lazy rehashing: the more operation you run into a hash table
# that is rehashing, the more rehashing "steps" are performed, so if the
# server is idle the rehashing is never complete and some more memory is used
# by the hash table.
#
# The default is to use this millisecond 10 times every second in order to
# actively rehash the main dictionaries, freeing memory when possible.
#
# If unsure:
# use "activerehashing no" if you have hard latency requirements and it is
# not a good thing in your environment that Redis can reply from time to time
# to queries with 2 milliseconds delay.
#
# use "activerehashing yes" if you don't have such hard requirements but
# want to free memory asap when possible.
activerehashing yes
# The client output buffer limits can be used to force disconnection of clients
# that are not reading data from the server fast enough for some reason (a
# common reason is that a Pub/Sub client can't consume messages as fast as the
# publisher can produce them).
#
# The limit can be set differently for the three different classes of clients:
#
# normal -> normal clients including MONITOR clients
# replica -> replica clients
# pubsub -> clients subscribed to at least one pubsub channel or pattern
#
# The syntax of every client-output-buffer-limit directive is the following:
#
# client-output-buffer-limit
#
# A client is immediately disconnected once the hard limit is reached, or if
# the soft limit is reached and remains reached for the specified number of
# seconds (continuously).
# So for instance if the hard limit is 32 megabytes and the soft limit is
# 16 megabytes / 10 seconds, the client will get disconnected immediately
# if the size of the output buffers reach 32 megabytes, but will also get
# disconnected if the client reaches 16 megabytes and continuously overcomes
# the limit for 10 seconds.
#
# By default normal clients are not limited because they don't receive data
# without asking (in a push way), but just after a request, so only
# asynchronous clients may create a scenario where data is requested faster
# than it can read.
#
# Instead there is a default limit for pubsub and replica clients, since
# subscribers and replicas receive data in a push fashion.
#
# Note that it doesn't make sense to set the replica clients output buffer
# limit lower than the repl-backlog-size config (partial sync will succeed
# and then replica will get disconnected).
# Such a configuration is ignored (the size of repl-backlog-size will be used).
# This doesn't have memory consumption implications since the replica client
# will share the backlog buffers memory.
#
# Both the hard or the soft limit can be disabled by setting them to zero.
client-output-buffer-limit normal 0 0 0
client-output-buffer-limit replica 256mb 64mb 60
client-output-buffer-limit pubsub 32mb 8mb 60
# Client query buffers accumulate new commands. They are limited to a fixed
# amount by default in order to avoid that a protocol desynchronization (for
# instance due to a bug in the client) will lead to unbound memory usage in
# the query buffer. However you can configure it here if you have very special
# needs, such as a command with huge argument, or huge multi/exec requests or alike.
#
# client-query-buffer-limit 1gb
# Defines how many commands in each client pipeline to decode and prefetch
# lookahead 16
# In some scenarios client connections can hog up memory leading to OOM
# errors or data eviction. To avoid this we can cap the accumulated memory
# used by all client connections (all pubsub and normal clients). Once we
# reach that limit connections will be dropped by the server freeing up
# memory. The server will attempt to drop the connections using the most
# memory first. We call this mechanism "client eviction".
#
# Client eviction is configured using the maxmemory-clients setting as follows:
# 0 - client eviction is disabled (default)
#
# A memory value can be used for the client eviction threshold,
# for example:
# maxmemory-clients 1g
#
# A percentage value (between 1% and 100%) means the client eviction threshold
# is based on a percentage of the maxmemory setting. For example to set client
# eviction at 5% of maxmemory:
# maxmemory-clients 5%
# In the Redis protocol, bulk requests, that are, elements representing single
# strings, are normally limited to 512 mb. However you can change this limit
# here, but must be 1mb or greater
#
# proto-max-bulk-len 512mb
# Redis calls an internal function to perform many background tasks, like
# closing connections of clients in timeout, purging expired keys that are
# never requested, and so forth.
#
# Not all tasks are performed with the same frequency, but Redis checks for
# tasks to perform according to the specified "hz" value.
#
# By default "hz" is set to 10. Raising the value will use more CPU when
# Redis is idle, but at the same time will make Redis more responsive when
# there are many keys expiring at the same time, and timeouts may be
# handled with more precision.
#
# The range is between 1 and 500, however a value over 100 is usually not
# a good idea. Most users should use the default of 10 and raise this up to
# 100 only in environments where very low latency is required.
hz 10
# Normally it is useful to have an HZ value which is proportional to the
# number of clients connected. This is useful in order, for instance, to
# avoid too many clients are processed for each background task invocation
# in order to avoid latency spikes.
#
# Since the default HZ value by default is conservatively set to 10, Redis
# offers, and enables by default, the ability to use an adaptive HZ value
# which will temporarily raise when there are many connected clients.
#
# When dynamic HZ is enabled, the actual configured HZ will be used
# as a baseline, but multiples of the configured HZ value will be actually
# used as needed once more clients are connected. In this way an idle
# instance will use very little CPU time while a busy instance will be
# more responsive.
dynamic-hz yes
# When a child rewrites the AOF file, if the following option is enabled
# the file will be fsync-ed every 4 MB of data generated. This is useful
# in order to commit the file to the disk more incrementally and avoid
# big latency spikes.
aof-rewrite-incremental-fsync yes
# When redis saves RDB file, if the following option is enabled
# the file will be fsync-ed every 4 MB of data generated. This is useful
# in order to commit the file to the disk more incrementally and avoid
# big latency spikes.
rdb-save-incremental-fsync yes
# Redis LFU eviction (see maxmemory setting) can be tuned. However it is a good
# idea to start with the default settings and only change them after investigating
# how to improve the performances and how the keys LFU change over time, which
# is possible to inspect via the OBJECT FREQ command.
#
# There are two tunable parameters in the Redis LFU implementation: the
# counter logarithm factor and the counter decay time. It is important to
# understand what the two parameters mean before changing them.
#
# The LFU counter is just 8 bits per key, it's maximum value is 255, so Redis
# uses a probabilistic increment with logarithmic behavior. Given the value
# of the old counter, when a key is accessed, the counter is incremented in
# this way:
#
# 1. A random number R between 0 and 1 is extracted.
# 2. A probability P is calculated as 1/(old_value*lfu_log_factor+1).
# 3. The counter is incremented only if R < P.
#
# The default lfu-log-factor is 10. This is a table of how the frequency
# counter changes with a different number of accesses with different
# logarithmic factors:
#
# +--------+------------+------------+------------+------------+------------+
# | factor | 100 hits | 1000 hits | 100K hits | 1M hits | 10M hits |
# +--------+------------+------------+------------+------------+------------+
# | 0 | 104 | 255 | 255 | 255 | 255 |
# +--------+------------+------------+------------+------------+------------+
# | 1 | 18 | 49 | 255 | 255 | 255 |
# +--------+------------+------------+------------+------------+------------+
# | 10 | 10 | 18 | 142 | 255 | 255 |
# +--------+------------+------------+------------+------------+------------+
# | 100 | 8 | 11 | 49 | 143 | 255 |
# +--------+------------+------------+------------+------------+------------+
#
# NOTE: The above table was obtained by running the following commands:
#
# redis-benchmark -n 1000000 incr foo
# redis-cli object freq foo
#
# NOTE 2: The counter initial value is 5 in order to give new objects a chance
# to accumulate hits.
#
# The counter decay time is the time, in minutes, that must elapse in order
# for the key counter to be decremented.
#
# The default value for the lfu-decay-time is 1. A special value of 0 means we
# will never decay the counter.
#
# lfu-log-factor 10
# lfu-decay-time 1
# The maximum number of new client connections accepted per event-loop cycle. This configuration
# is set independently for TLS connections.
#
# By default, up to 10 new connection will be accepted per event-loop cycle for normal connections
# and up to 1 new connection per event-loop cycle for TLS connections.
#
# Adjusting this to a larger number can slightly improve efficiency for new connections
# at the risk of causing timeouts for regular commands on established connections. It is
# not advised to change this without ensuring that all clients have limited connection
# pools and exponential backoff in the case of command/connection timeouts.
#
# If your application is establishing a large number of new connections per second you should
# also consider tuning the value of tcp-backlog, which allows the kernel to buffer more
# pending connections before dropping or rejecting connections.
#
# max-new-connections-per-cycle 10
# max-new-tls-connections-per-cycle 1
########################### ACTIVE DEFRAGMENTATION #######################
#
# What is active defragmentation?
# -------------------------------
#
# Active (online) defragmentation allows a Redis server to compact the
# spaces left between small allocations and deallocations of data in memory,
# thus allowing to reclaim back memory.
#
# Fragmentation is a natural process that happens with every allocator (but
# less so with Jemalloc, fortunately) and certain workloads. Normally a server
# restart is needed in order to lower the fragmentation, or at least to flush
# away all the data and create it again. However thanks to this feature
# implemented by Oran Agra for Redis 4.0 this process can happen at runtime
# in a "hot" way, while the server is running.
#
# Basically when the fragmentation is over a certain level (see the
# configuration options below) Redis will start to create new copies of the
# values in contiguous memory regions by exploiting certain specific Jemalloc
# features (in order to understand if an allocation is causing fragmentation
# and to allocate it in a better place), and at the same time, will release the
# old copies of the data. This process, repeated incrementally for all the keys
# will cause the fragmentation to drop back to normal values.
#
# Important things to understand:
#
# 1. This feature is disabled by default, and only works if you compiled Redis
# to use the copy of Jemalloc we ship with the source code of Redis.
# This is the default with Linux builds.
#
# 2. You never need to enable this feature if you don't have fragmentation
# issues.
#
# 3. Once you experience fragmentation, you can enable this feature when
# needed with the command "CONFIG SET activedefrag yes".
#
# The configuration parameters are able to fine tune the behavior of the
# defragmentation process. If you are not sure about what they mean it is
# a good idea to leave the defaults untouched.
# Active defragmentation is disabled by default
# activedefrag no
# Minimum amount of fragmentation waste to start active defrag
# active-defrag-ignore-bytes 100mb
# Minimum percentage of fragmentation to start active defrag.
# This value should be less than active-defrag-threshold-upper. Otherwise,
# active defrag will use the maximum CPU effort once this threshold is reached.
# active-defrag-threshold-lower 10
# Maximum percentage of fragmentation at which we use maximum effort
# active-defrag-threshold-upper 100
# Minimal effort for defrag in CPU percentage, to be used when the lower
# threshold is reached
# active-defrag-cycle-min 1
# Maximal effort for defrag in CPU percentage, to be used when the upper
# threshold is reached
# active-defrag-cycle-max 25
# Maximum number of set/hash/zset/list fields that will be processed from
# the main dictionary scan
# active-defrag-max-scan-fields 1000
# Jemalloc background thread for purging will be enabled by default
jemalloc-bg-thread yes
# It is possible to pin different threads and processes of Redis to specific
# CPUs in your system, in order to maximize the performances of the server.
# This is useful both in order to pin different Redis threads in different
# CPUs, but also in order to make sure that multiple Redis instances running
# in the same host will be pinned to different CPUs.
#
# Normally you can do this using the "taskset" command, however it is also
# possible to this via Redis configuration directly, both in Linux and FreeBSD.
#
# You can pin the server/IO threads, bio threads, aof rewrite child process, and
# the bgsave child process. The syntax to specify the cpu list is the same as
# the taskset command:
#
# Set redis server/io threads to cpu affinity 0,2,4,6:
# server-cpulist 0-7:2
#
# Set bio threads to cpu affinity 1,3:
# bio-cpulist 1,3
#
# Set aof rewrite child process to cpu affinity 8,9,10,11:
# aof-rewrite-cpulist 8-11
#
# Set bgsave child process to cpu affinity 1,10,11
# bgsave-cpulist 1,10-11
# In some cases redis will emit warnings and even refuse to start if it detects
# that the system is in bad state, it is possible to suppress these warnings
# by setting the following config which takes a space delimited list of warnings
# to suppress
#
# ignore-warnings ARM64-COW-BUG
# When enabled, 'key-memory-histograms' adds per-type memory allocation histograms
# (distrib_*_sizes fields in bytes) to INFO keysizes output, complementing the
# existing size/item histograms with actual memory usage data.
#
# This setting must be enabled at startup; later config changes have no effect.
# It is also implicitly enabled when 'cluster-slot-stats-enabled' is set.
#
# key-memory-histograms no
# >>> BEGIN section: Modules (regenerated on every sync) <<<
# Auto-generated by `make sync-redis-conf` — do NOT edit this block by hand;
# it is stripped and regenerated on every sync. Everything above is the
# Redis-core config from redis.conf, emitted verbatim.
#
# Generated: 2026-07-30T12:58:41Z
# Requested:
# Active: redisbloom redisearch redisjson redistimeseries
# Missing .so:
# Bad manifest:
# >>> BEGIN: loadmodule paths (replaced by make deploy) <<<
loadmodule /usr/lib/redis/modules/redisbloom.so
loadmodule /usr/lib/redis/modules/redisearch.so
loadmodule /usr/lib/redis/modules/rejson.so
loadmodule /usr/lib/redis/modules/redistimeseries.so
# <<< END: loadmodule paths <<<
# >>> BEGIN module: redisbloom <<<
########################### BLOOM FILTERS CONFIG ##############################
# Defaults values for new Bloom filters created with BF.ADD, BF.MADD, BF.INSERT, and BF.RESERVE
# These defaults are applied to each new Bloom filter upon its creation.
# Error ratio
# The desired probability for false positives.
# For a false positive rate of 0.1% (1 in 1000) - the value should be 0.001.
# double, Valid range: (0 .. 1), value greater than 0.25 is treated as 0.25, default: 0.01
#
# bf-error-rate 0.01
# Initial capacity
# The number of entries intended to be added to the filter.
# integer, valid range: [1 .. 1GB], default: 100
#
# bf-initial-size 100
# Expansion factor
# When capacity is reached, an additional sub-filter is created.
# The size of the new sub-filter is the size of the last sub-filter multiplied
# by expansion.
# integer, [0 .. 32768]. 0 is equivalent to NONSCALING. default: 2
#
# bf-expansion-factor 2
########################### CUCKOO FILTERS CONFIG #############################
# Defaults values for new Cuckoo filters created with
# CF.ADD, CF.ADDNX, CF.INSERT, CF.INSERTNX, and CF.RESERVE
# These defaults are applied to each new Cuckoo filter upon its creation.
# Initial capacity
# A filter will likely not fill up to 100% of its capacity.
# Make sure to reserve extra capacity if you want to avoid expansions.
# value is rounded to the next 2^n integer.
# integer, valid range: [2*cf-bucket-size .. 1GB], default: 1024
#
# cf-initial-size 1024
# Number of items in each bucket
# The minimal false positive rate is 2/255 ~ 0.78% when bucket size of 1 is used.
# Larger buckets increase the error rate linearly, but improve the fill rate.
# integer, valid range: [1 .. 255], default: 2
#
# cf-bucket-size 2
# Maximum iterations
# Number of attempts to swap items between buckets before declaring filter
# as full and creating an additional filter.
# A lower value improves performance. A higher value improves fill rate.
# integer, Valid range: [1 .. 65535], default: 20
#
# cf-max-iterations 20
# Expansion factor
# When a new filter is created, its size is the size of the current filter
# multiplied by this factor.
# integer, Valid range: [0 .. 32768], 0 is equivalent to NONSCALING, default: 1
#
# cf-expansion-factor 1
# Maximum expansions
# integer, Valid range: [1 .. 65536], default: 32
#
# cf-max-expansions 32
# <<< END module: redisbloom <<<
# >>> BEGIN module: redisearch <<<
############################## QUERY ENGINE CONFIG ############################
# The number of iterations to run while performing background indexing
# before we call usleep(1) (sleep for 1 micro-second) and make sure that we
# allow redis to process other commands.
# numeric, valid range: [1, UINT32_MAX], default: 100
#
# search-bg-index-sleep-gap 100
# The default dialect used in search queries.
# numeric, valid range: [1, 4], default: 1
#
# search-default-dialect 1
# the fork gc will only start to clean when the number of not cleaned document
# will exceed this threshold.
# numeric, valid range: [1, LLONG_MAX], default: 100
#
# search-fork-gc-clean-threshold 100
# interval (in seconds) in which to retry running the forkgc after failure.
# numeric, valid range: [1, LLONG_MAX], default: 5
#
# search-fork-gc-retry-interval 5
# interval (in seconds) in which to run the fork gc (relevant only when fork
# gc is used).
# numeric, valid range: [1, LLONG_MAX], default: 30
#
# search-fork-gc-run-interval 30
# the amount of seconds for the fork GC to sleep before exiting.
# numeric, valid range: [0, LLONG_MAX], default: 0
#
# search-fork-gc-sleep-before-exit 0
# Scan this many documents at a time during every GC iteration.
# numeric, valid range: [1, LLONG_MAX], default: 100
#
# search-gc-scan-size 100
# Max number of cursors for a given index that can be opened inside of a shard.
# numeric, valid range: [0, LLONG_MAX], default: 128
#
# search-index-cursor-limit 128
# Maximum number of results from ft.aggregate command.
# numeric, valid range: [0, (1ULL << 31)], default: 1ULL << 31
#
# search-max-aggregate-results 2147483648
# Maximum prefix expansions to be used in a query.
# numeric, valid range: [1, LLONG_MAX], default: 200
#
# search-max-prefix-expansions 200
# Maximum runtime document table size (for this process).
# numeric, valid range: [1, 100000000], default: 1000000
#
# search-max-doctablesize 1000000
# max idle time allowed to be set for cursor, setting it high might cause
# high memory consumption.
# numeric, valid range: [1, LLONG_MAX], default: 300000
#
# search-cursor-max-idle 300000
# Maximum number of results from ft.search command.
# numeric, valid range: [0, 1ULL << 31], default: 1000000
#
# search-max-search-results 1000000
# Number of worker threads to use for background tasks when the server is
# in an operation event.
# numeric, valid range: [0, 16], default: 4
#
# search-min-operation-workers 4
# Minimum length of term to be considered for phonetic matching.
# numeric, valid range: [1, LLONG_MAX], default: 3
#
# search-min-phonetic-term-len 3
# the minimum prefix for expansions (`*`).
# numeric, valid range: [1, LLONG_MAX], default: 2
#
# search-min-prefix 2
# the minimum word length to stem.
# numeric, valid range: [2, UINT32_MAX], default: 4
#
# search-min-stem-len 4
# Delta used to increase positional offsets between array
# slots for multi text values.
# Can control the level of separation between phrases in different
# array slots (related to the SLOP parameter of ft.search command)"
# numeric, valid range: [1, UINT32_MAX], default: 100
#
# search-multi-text-slop 100
# Used for setting the buffer limit threshold for vector similarity tiered
# HNSW index, so that if we are using WORKERS for indexing, and the
# number of vectors waiting in the buffer to be indexed exceeds this limit,
# we insert new vectors directly into HNSW.
# numeric, valid range: [0, LLONG_MAX], default: 1024
#
# search-tiered-hnsw-buffer-limit 1024
# Query timeout.
# numeric, valid range: [1, LLONG_MAX], default: 500
#
# search-timeout 500
# minimum number of iterators in a union from which the iterator will
# will switch to heap-based implementation.
# numeric, valid range: [1, LLONG_MAX], default: 20
# switch to heap based implementation.
#
# search-union-iterator-heap 20
# The maximum memory resize for vector similarity indexes (in bytes).
# numeric, valid range: [0, UINT32_MAX], default: 0
#
# search-vss-max-resize 0
# Number of worker threads to use for query processing and background tasks.
# numeric, valid range: [0, MAX_WORKER_THREADS], default: min(MAX_WORKER_THREADS, number of CPU cores)
# This configuration also affects the number of connections per shard.
#
# search-workers 16
# The number of high priority tasks to be executed at any given time by the
# worker thread pool, before executing low priority tasks. After this number
# of high priority tasks are being executed, the worker thread pool will
# execute high and low priority tasks alternately.
# numeric, valid range: [0, LLONG_MAX], default: 1
#
# search-workers-priority-bias-threshold 1
# Load extension scoring/expansion module. Immutable.
# string, default: ""
#
# search-ext-load ""
# Path to Chinese dictionary configuration file (for Chinese tokenization). Immutable.
# string, default: ""
#
# search-friso-ini ""
# Default scorer to use for scoring documents.
# string, default: "BM25STD"
#
# search-default-scorer "BM25STD"
# Action to perform when search timeout is exceeded.
# enum, valid values: ["return", "fail", "return-strict"], default: "return"
#
# search-on-timeout return
# Action to perform when an out-of-memory state is encountered.
# enum, valid values: ["return", "fail", "ignore"], default: "return"
#
# search-on-oom return
# Set to run without memory pools.
# bool, default: no
#
# search-no-mem-pools no
# Disable garbage collection (for this process).
# bool, default: no
#
# search-no-gc no
# Enable commands filter which optimize indexing on partial hash updates.
# bool, default: no
#
# search-partial-indexed-docs no
# Disable compression for DocID inverted index. Boost CPU performance.
# bool, default: no
#
# search-raw-docid-encoding no
# Enable unstable features.
# bool, default: no
#
# search-enable-unstable-features no
# Number of search threads in the coordinator thread pool.
# numeric, valid range: [1, LLONG_MAX], default: 20
#
# search-threads 20
# Number of I/O threads in the coordinator.
# numeric, valid range: [1, 256], default: 1
#
# search-io-threads 1
# Timeout for topology validation (in milliseconds). After this timeout,
# any pending requests will be processed, even if the topology is not fully connected.
# numeric, valid range: [0, LLONG_MAX], default: 30000
#
# search-topology-validation-timeout 30000
# Maximum number of replies to accumulate before triggering `_FT.CURSOR READ`
# on the shards.
# numeric, valid range: [1, LLONG_MAX], default: 1
#
# search-cursor-reply-threshold 1
# Number of connections to each shard in the cluster. If set to 0, the number
# of connections is set to `search-workers` + 1.
# numeric, valid range: [0, UINT32_MAX], default: 0
#
# search-conn-per-shard 0
# Per-attempt timeout for inter-shard connection setup (in milliseconds). Bounds
# the TCP+TLS handshake so a blackholed SYN does not stall a connection
# indefinitely. 0 disables the timeout.
# numeric, valid range: [0, INT_MAX], default: 10000
#
# search-connect-timeout 10000
# Set the BM25STD.TANH stretch factor. This is an integer value that divides the argument
# of the tanh function that is used to normalize the score computed by the BM25STD scorer.
# numeric, valid range: [1, 10000], default: 4
#
# search-bm25std-tanh-factor 4
# The number of indexing operations to perform before yielding to allow redis be responsive while loading.
# numeric, valid range: [1, UINT32_MAX], default: 1000
#
# search-indexer-yield-every-ops 1000
# Sleep duration in microseconds during background indexing. We sleep periodically
# (every `search-bg-index-sleep-gap` iterations) to allow the main thread to acquire
# the GIL and process commands.
# numeric, valid range: [1, 999999], default: 1
#
# search-bg-index-sleep-duration-us 1
# Enable monitoring of key and field expiration (set via EXPIRE, EXPIREAT, HEXPIRE, etc.)
# for indexes. When enabled, indexes track expiration times and filter out expired
# documents and fields from search results.
# bool, default: yes
#
# search-monitor-expiration yes
# <<< END module: redisearch <<<
# >>> BEGIN module: redisjson <<<
############################## JSON ENGINE CONFIG ############################
# <<< END module: redisjson <<<
# >>> BEGIN module: redistimeseries <<<
############################## TIME SERIES CONFIG #############################
# The maximal number of per-shard threads for cross-key queries when using cluster mode
# (TS.MRANGE, TS.MREVRANGE, TS.MGET, and TS.QUERYINDEX).
# Note: increasing this value may either increase or decrease the performance.
# integer, valid range: [1..16], default: 3
# This is a load-time configuration parameter.
#
# ts-num-threads 3
# Protocol used by LibMR commands for cross-key queries in cluster mode.
# The "old" way was to use the full redis gears protocol, the "new" way uses internal commands, which is faster.
# valid values: INTERNAL, GEARS, default: INTERNAL
# This is a load-time configuration parameter.
#
# ts-libmr-protocol INTERNAL
# Default compaction rules for newly created key with TS.ADD, TS.INCRBY, and TS.DECRBY.
# Has no effect on keys created with TS.CREATE.
# This default value is applied to each new time series upon its creation.
# string, see documentation for rules format, default: no compaction rules
#
# ts-compaction-policy ""
# Default chunk encoding for automatically-created compacted time series.
# This default value is applied to each new compacted time series automatically
# created when ts-compaction-policy is specified.
# valid values: COMPRESSED, UNCOMPRESSED, default: COMPRESSED
#
# ts-encoding COMPRESSED
# Default retention period, in milliseconds. 0 means no expiration.
# This default value is applied to each new time series upon its creation.
# If ts-compaction-policy is specified - it is overridden for created
# compactions as specified in ts-compaction-policy.
# integer, valid range: [0 .. LLONG_MAX], default: 0
#
# ts-retention-policy 0
# Default policy for handling insertion (TS.ADD and TS.MADD) of multiple
# samples with identical timestamps.
# This default value is applied to each new time series upon its creation.
# string, valid values: BLOCK, FIRST, LAST, MIN, MAX, SUM, default: BLOCK
#
# ts-duplicate-policy BLOCK
# Default initial allocation size, in bytes, for the data part of each new chunk
# This default value is applied to each new time series upon its creation.
# integer, valid range: [48 .. 1048576]; must be a multiple of 8, default: 4096
#
# ts-chunk-size-bytes 4096
# Default values for newly created time series.
# Many sensors report data periodically. Often, the difference between the measured
# value and the previous measured value is negligible and related to random noise
# or to measurement accuracy limitations. In such situations it may be preferable
# not to add the new measurement to the time series.
# A new sample is considered a duplicate and is ignored if the following conditions are met:
# - The time series is not a compaction;
# - The time series' DUPLICATE_POLICY IS LAST;
# - The sample is added in-order (timestamp >= max_timestamp);
# - The difference of the current timestamp from the previous timestamp
# (timestamp - max_timestamp) is less than or equal to ts-ignore-max-time-diff
# - The absolute value difference of the current value from the value at the previous maximum timestamp
# (abs(value - value_at_max_timestamp) is less than or equal to ts-ignore-max-val-diff.
# where max_timestamp is the timestamp of the sample with the largest timestamp in the time series,
# and value_at_max_timestamp is the value at max_timestamp.
# ts-ignore-max-time-diff: integer, valid range: [0 .. LLONG_MAX], default: 0
# ts-ignore-max-val-diff: double, Valid range: [0 .. DBL_MAX], default: 0
#
# ts-ignore-max-time-diff 0
# ts-ignore-max-val-diff 0
# <<< END module: redistimeseries <<< # <<< END section: Modules <<<